How to Accept Payments on Your MCP Server
How to Accept Payments on Your MCP Server
The Model Context Protocol (MCP) provides a standardized way for connecting AI agents to external tools and data sources. This equips AI agents with smarter capabilities, allowing them to perform actions beyond mere text generation. With the protocol's increasing popularity, many companies have rolled out MCP servers, libraries, or wrappers that support the protocol. One interesting example is the Stripe Agent Toolkit Cloudflare directory that provides specialized components to build a paid MCP server using Cloudflare Workers.
It’s a great tool for developers looking to create monetized AI services. It basically allows us to configure AI agents (through MCP) to access tools that require payment before execution.
In this detailed guide, we’ll walk you through the step-by-step implementation of the Stripe Agent Toolkit to accept payments on your MCP server.
First, let’s understand the Agent Toolkit and its use cases.
Understanding the Stripe Agent Toolkit Cloudflare Component for MCP
Stripe Agent Toolkit is a comprehensive library provided by Stripe that enables the integration of Stripe's billing and payment functionalities into AI agent workflows. It supports MCP, enabling standardized communication between AI agents and external services.
The toolkit provides a specialized Cloudflare component/directory containing modules designed to integrate Stripe's billing features with Cloudflare Workers. Using these modules, we can deploy our MCP server on Cloudflare Workers and integrate Stripe's payment processing to monetize tool usage.
For example, it includes a PaidMcpAgent component, which extends Cloudflare's McpAgent for incorporating stripe’s billing capabilities.
This allows us to configure AI agents to require payments from users to use specific tools. For example, we can create an MCP server with a paid emoji generator tool and integrate it with an MCP client like Claude.
Now, when a user sends a prompt to Claude to generate an emoji, it will ask the user to first complete the payment process through Stripe. Basically, the AI agent will access the paid tool through standardized MCP calls, with Stripe handling the billing aspects.
The toolkit supports various payment models, including one-time payments, subscriptions, and usage-based billing.
Use Cases of Agent Toolkit
Here are some of the ways we can utilize the Stripe Agent Toolkit for accepting payments on an MCP server:
-
Research Assistant: Users can ask the AI agent to provide summarized research reports. The AI agent first asks for payment.
-
Legal Consultation Bot: Users can send a prompt to get legal advice related to their particular case. The AI agent asks the user to first pay a fee through Stripe.
-
Resume Review Service: Users can attach their resume and ask the AI agent to review it and provide suggestions for improvements. The AI agent provides resume critiques based on a pay-per-review model.
-
Language Tutoring Bot: Users can take language practice sessions with the AI agent based on per-session billing.
-
Code Review Agent: Developers can ask the AI agent to analyze and review code snippets or pull requests. The AI agent asks the users to complete the payment process through Stripe before it provides the code review.
Accept Payments on Your MCP Server - Step by Step Guide
In this tutorial, we’ll create an MCP server through the Stripe Agent Toolkit to accept payment on our MCP server. We’ll deploy it on Cloudflare Workers, and Stripe will handle the payment process.
For the purpose of this tutorial, we’ve created a paid emoji generator tool. So, when we integrate our MCP server with an AI agent or MCP client like Claude, the AI agent will ask the user to first complete the payment process before it generates an emoji.
Let’s start with prerequisites.
Prerequisites
To get started, you’ll need:
-
Stripe Account: Create your Stripe Account. You’ll need this to accept payments and get your API keys and Product ID.
-
Cloudflare Account: Create your Cloudflare account. You’ll deploy your server here and use your Cloudflare dashboard to create a KV namespace and Webhooks endpoint.
-
Node.js and npm: If not already installed in your system, install Node.js. To confirm if Node.js and npm are properly installed, run the following commands in your terminal:
node -v

npm -v
- Install Wrangler: Wrangler is Cloudflare's CLI tool. You’ll need it to create and deploy your server to Cloudflare. To install Wrangler, run the following command in your terminal:
npm install \-g wrangler
Creating your Project
Open your terminal, create a new folder, and navigate into it:
mkdir my-paid-mcp-server

cd my-paid-mcp-server
Now run:
wrangler init
Or you can use:
npm create cloudflare@latest
When you run this command, wrangler will ask you a few questions in your terminal:
Wrangler will then create several files for you. Key files include:
-
package.json: For dependency management
-
wrangler.toml: It’s the main configuration file for a Cloudflare Workers project. It defines how Wrangler should build, run, and deploy your project.
-
src/index.ts: This will serve as the main entry point
Installing Required Packages
Run the following command in your terminal. Make sure you’re inside your project directory:
npm install @stripe/agent-toolkit @modelcontextprotocol/sdk
These packages will install the stripe/agent-toolkit, which will connect your MCP server to Stripe, and modelcontextprotocol/sdk, which will run your MCP server.
Updating package.json
Open your package.json file in your code editor and put the following code in it:
{

  "name": "emoji-mcp-stripe",

  "version": "1.0.0",

  "scripts": {

    "build": "tsc",

    "start": "node dist/index.js"

  },

  "dependencies": {

    "@modelcontextprotocol/sdk": "^1.12.0",

    "axios": "^1.6.8",

    "body-parser": "^1.20.2",

    "express": "^4.18.2",

    "stripe": "^14.23.0",

    "zod": "^3.25.30"

  },

  "devDependencies": {

    "typescript": "^5.8.3"

  }

}
Updating the index Code
Add the following code to your index.ts file for now (we’ll implement the main logic later):
import { McpServer } from "@modelcontextprotocol/sdk/server/mcp.js";
import { experimental_PaidMcpAgent } from "@stripe/agent-toolkit/cloudflare";

export default {
  async fetch(request: Request, env: any, ctx: ExecutionContext): Promise<Response> {
    const agent = new experimental_PaidMcpAgent({
      stripeSecretKey: env.STRIPE_SECRET_KEY,
    });

    const server = new McpServer({ agent });

    return server.handleRequest(request);
  },
};
Adding your Stripe Secret Key
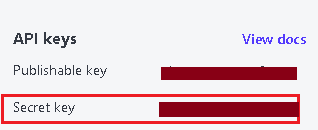
To get your Stripe API key, go to your Stripe dashboard. On the right side, you’ll find your secret key:
For local development and testing, you can create a .env file and put your environment variables in it, for example:
STRIPE_SECRET_KEY=sk_test //replace with your actual Stripe API key
However, for production deployment, it’s best to add it through:
npx wrangler secret put STRIPE_SECRET_KEY
Configuring wrangler.toml
Open your wrangler.toml file and add make sure it looks like this:
{
  "name": "your-worker-name",
  "main": "src/index.ts",
  "type": "module",
  "compatibility_date": "2025-05-22",

  // Environment variables
  "vars": {
    "STRIPE_SECRET_KEY": "sk_test_fake_placeholder"
  }
}
This lets Cloudflare know what environment variable your Worker expects.
Deploying to Cloudflare
Run the following command in your terminal:
wrangler deploy
You’ll now get a URL like “https://my-paid-mcp-server.your-username.workers.dev”
We’ll use this URL to implement our main logic (accepting payments through the MCP server for our emoji generator tool).
Updating your index.ts
We'll now update our index.ts file. This will serve as the main entry point and also include the web interface.
First, let's define required imports and exports:
import { PaidMcpAgent } from "./agent"; //This file will generate the emoji generation tool with its payment configuration. Code provided in the next section.

export { PaidMcpAgent };
We'll now create the entry point of the Cloudflare Worker that will handle HTTP requests:
export default {
  async fetch(request: Request, env: Env, ctx: ExecutionContext): Promise<Response> {
    const url = new URL(request.url);
    const pathname = url.pathname;
Next, we'll define a CORS handler to handle CORS preflight requests to allow cross-origin access:
if (request.method === "OPTIONS") {
  return new Response(null, {
    status: 204,
    headers: {
      "Access-Control-Allow-Origin": "*",
      "Access-Control-Allow-Methods": "GET, POST, OPTIONS",
      "Access-Control-Allow-Headers": "*",
    }
  });
}
Now, we can create our payment success and cancel pages using HTML. Here's an example of a payment success page:
// Handle GET /success
if (request.method === "GET" && pathname === "/success") {
  return new Response(
    `<html>
      <head><title>Payment Successful</title></head>
      <body style="font-family: sans-serif; text-align: center; margin-top: 5rem;">
        <h1>Payment Successful!</h1>
        <p>You're now subscribed and can access the protected content.</p>
        <p>You can now use the emoji generator tool!</p>
        <a href="/" style="background: #28a745; color: white; padding: 10px 20px; text-decoration: none; border-radius: 5px; display: inline-block; margin-top: 20px;">
          Try the Tool Now
        </a>
      </body>
    </html>`,
    {
      headers: {
        "Content-Type": "text/html",
        "Access-Control-Allow-Origin": "*",
      },
    }
  );
}
This will return a success page after successful payment, with a link to use the tool. Similarly, we can create a payment cancel page.
We'll now create our main tool interface. The code below doesn't contain styling code but you can find the complete code in the link provided at the end of this section.
if (request.method === "GET" && pathname === "/") {
      return new Response(
        `<html>
          <head>
            <title>Emoji Generator</title>
          </head>
          <body>
            <div class="container">
              <h1> Emoji Generator</h1>
              <p>Transform any word into the perfect emoji!</p>
              <form action="/run" method="POST">
                <div style="margin: 20px 0;">
                  <input name="email" type="email" placeholder="Enter your email" required style="width: 250px;" />
                </div>
                <div style="margin: 20px 0;">
                  <input name="object" placeholder="Enter a word (e.g., happy, fire, love)" required style="width: 250px;" />
                </div>
                <button type="submit">Generate Emoji </button>
              </form>
              <p style="color: #666; margin-top: 30px; font-size: 14px;">
                 This is a premium service. First-time users will be prompted to complete payment.
              </p>
            </div>
          </body>
        </html>`,
        {
          headers: {
            "Content-Type": "text/html",
            "Access-Control-Allow-Origin": "*",
          },
        }
      );
    }
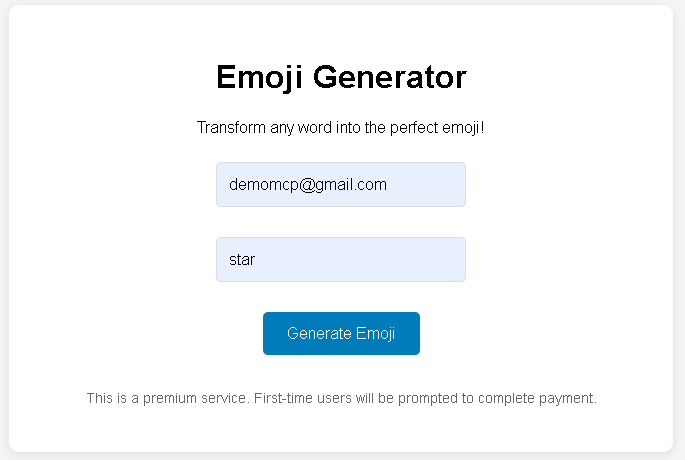
This code responds to a GET/request by sending an HTML page with a form where users can input their email and a word, and submit it to /run to generate an emoji. So, when you open your Cloudflare domain in the browser, it will display an HTML form with:
-
An email input
-
A text input for a word, such as start or happy
-
A submit button that sends a POST request to /run
We'll now define the tool execution handler with the payment flow:
// Handle POST /run
if (request.method === "POST" && pathname === "/run") {
  try {
    const form = await request.formData();
    const object = form.get("object");
    const email = form.get("email");

    // Input validation...

    const id = env.PaidMcpAgent.idFromName("default");
    const stub = env.PaidMcpAgent.get(id);

    const payload = {
      tool: "generate_emoji",
      params: { object: object.trim() },
      email: email.trim(),
    };

    const result = await stub.fetch(
      new Request(request.url, {
        method: "POST",
        headers: {
          "Content-Type": "application/json",
        },
        body: JSON.stringify(payload),
      })
    );

    const responseData = await result.json();

    // If payment is required, create a checkout session
    if (result.status === 402 && responseData.requiresPayment) {
      try {
        // Create checkout session
        const checkoutPayload = {
          email: email.trim(),
          toolName: responseData.toolName
        };

        const checkoutResponse = await stub.fetch(
          new Request(request.url.replace('/run', '/create-checkout-session'), {
            method: "POST",
            headers: {
              "Content-Type": "application/json",
            },
            body: JSON.stringify(checkoutPayload),
          })
        );

        if (checkoutResponse.ok) {
          const checkoutData = await checkoutResponse.json();

          return new Response(
            `<html>
              <head>
                <title>Payment Required</title>
              </head>
              <body>
                <div class="container">
                  <h1>Payment Required</h1>
                  <p>To use the <strong>${responseData.toolName}</strong> tool, please complete your payment.</p>
                  <div style="background: #f8f9fa; padding: 20px; border-radius: 8px; margin: 20px 0;">
                    <p><strong>Email:</strong> ${email.trim()}</p>
                    <p><strong>Tool:</strong> ${responseData.toolName}</p>
                    <p><strong>Word:</strong> "${object.trim()}"</p>
                  </div>
                  <p>Click below to securely pay with Stripe:</p>
                  <a href="${checkoutData.url}" class="pay-button">
                    Pay Securely with Stripe
                  </a>
                </div>
              </body>
            </html>`,
            {
              status: 402,
              headers: {
                "Content-Type": "text/html",
              },
            }
          );
        }
      } catch (checkoutError: any) {
        console.error("Checkout creation error:", checkoutError);
        // Error handling...
      }
    }

    // Success case - show the result
    if (result.ok) {
      return new Response(
        `<html>
          <head>
            <title>Emoji Generated</title>
          </head>
          <body>
            <div class="container">
              <h1>Success!</h1>
              <div class="result">
                ${responseData.content?.[0]?.text || JSON.stringify(responseData)}
          </body>
        </html>`,
        {
          headers: {
            "Content-Type": "text/html",
          },
        }
      );
    }
  } catch (error: any) {
    console.error("Error in /run:", error);
    // Error handling...
  }
}
This is the core handler that processes form submissions. It validates input, calls the MCP agent, and handles the payment flow. If payment is required (status 402), it creates a Stripe checkout session and shows a payment page. If the tool execution succeeds, it displays the generated emoji.
Since it's an MCP server, we'll need to connect it to an MCP client or AI agent. To do so, we need to create an MCP connection handler
// Handle GET /sse for Claude
if (request.method === "GET" && pathname === "/sse") {
  const id = env.PaidMcpAgent.idFromName("default");
  const stub = env.PaidMcpAgent.get(id);

  const sseResponse = await stub.fetch(
    new Request(request.url, {
      method: "GET",
      headers: {
        "Accept": "text/event-stream",
      },
    })
  );

  return new Response(sseResponse.body, {
    status: sseResponse.status,
    headers: {
      "Content-Type": "text/event-stream",
      "Cache-Control": "no-cache",
      "Connection": "keep-alive",
      "Access-Control-Allow-Origin": "*",
    },
  });
}
This handles Server-Sent Events (SSE) connections for MCP communication with Claude, forwarding requests to the Durable Object.
Here's how we can forward incoming requests to a Durable Object:
// Default: forward to Durable Object
    const id = env.PaidMcpAgent.idFromName("default");
    const stub = env.PaidMcpAgent.get(id);
    const response = await stub.fetch(request);

    return new Response(response.body, {
      status: response.status,
      headers: {
        ...Object.fromEntries(response.headers.entries()),
        "Access-Control-Allow-Origin": "*",
The code also returns the Durable Object's response to the client with appropriate CORS headers.
You can find the complete index.ts code here
Creating the agent.ts file
In your project directory, go to the src folder and create a file named agent.ts. In this file, we'll define a PaidMcpAgent class that extends experimental_PaidMcpAgent and sets up a paid API endpoint for generating emojis based on a user-supplied word. Here, the tool "generate_emoji" requires payment before it can be used. It uses Stripe for payment.
First, we'll define our imports:
import { experimental_PaidMcpAgent } from "../cloudflare"; //this is our main Worker file - code provided in the next section.
import { z } from "zod";
Here, 'experimental_PaidMcpAgent' is the main class that will be used as a base for creating a paid tool. zod is a schema validation library to ensure that incoming data, such as email addresses, is correctly structured.
Next, we'll define agent class:
export class PaidMcpAgent extends experimental_PaidMcpAgent {
  constructor(state: DurableObjectState, env: Env) {
    super(state, env);
    this.init();
  }
This extends the base MCP agent class and calls initialization.
Now, we'll define the initialization method:
  async init() {
    this.paidTool(
      "generate_emoji",
      "Generate an emoji based on a given word (requires payment)",
      ...
    );
  }
init() is an async setup function. It registers a new paid tool named "generate_emoji" via the inherited paidTool() method. This tool only runs after a user has completed payment.
We'll now define what input the tool expects using zod:
{
  object: z.string().describe("A single word to generate an emoji for"),
  email: z.string().email().describe("User email for payment verification"),
}
Next, we'll create our tool registration and configuration function:
 async ({ object, email }: { object: string; email: string }) => {
      // The payment check is handled in the MCP transport layer
      // This handler only executes after payment is verified
      const emojiMap: Record<string, string> = {
        happy: "😊",
        sad: "😢",
        love: "❤️",
        fire: "🔥",
        water: "💧",
        sun: "☀️",
        moon: "🌙",
        star: "⭐",
        heart: "💖",
        laugh: "😂"
      };

      const emoji = emojiMap[object.toLowerCase()] || "😊";

      return {
        content: [{ type: "text", text: `Generated emoji for ${object}: ${emoji}` }],
      };
    },
    {
      checkout: {
        success_url: "https:/your-domain.workers.dev/success",
        cancel_url: "https://your-domain.workers.dev/cancel",
        line_items: [
          {
            price: "your-Strip-price-ID",
            quantity: 1,
          },
        ],
        mode: "payment",
      },
      meterEvent: "emoji_generation",
      paymentReason: "Charge for generating an emoji",
    }
  );
}
This registers the emoji generation tool with its payment configuration, including Stripe price ID, success/cancel URLs, and the actual emoji mapping logic.
You can find the complete code here
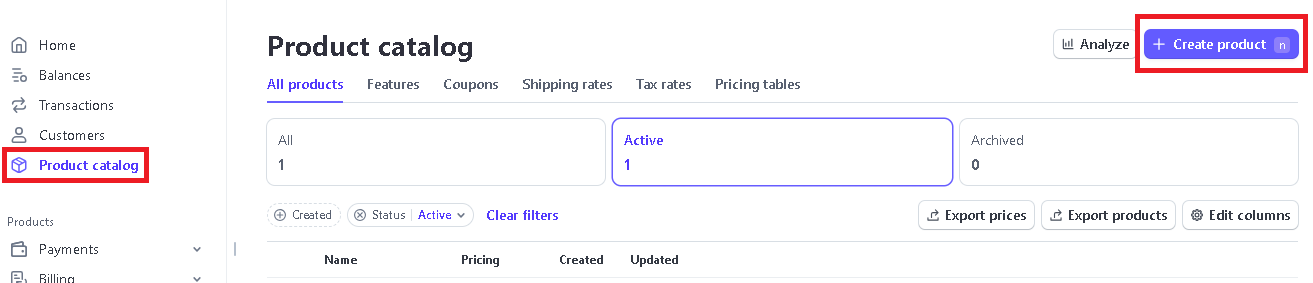
You need to add a valid price_ID here. To get your price ID, go to your Stripe dashboard and click ‘Product catalog’. Then, click ‘create product’.
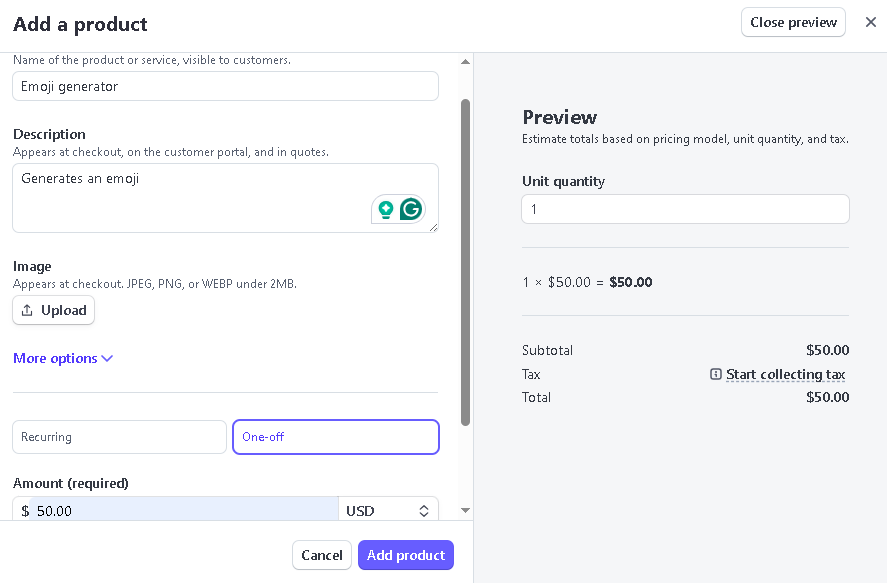
Enter a product name, price, and description:
Once you create the product, you can find price_ID on the product page:
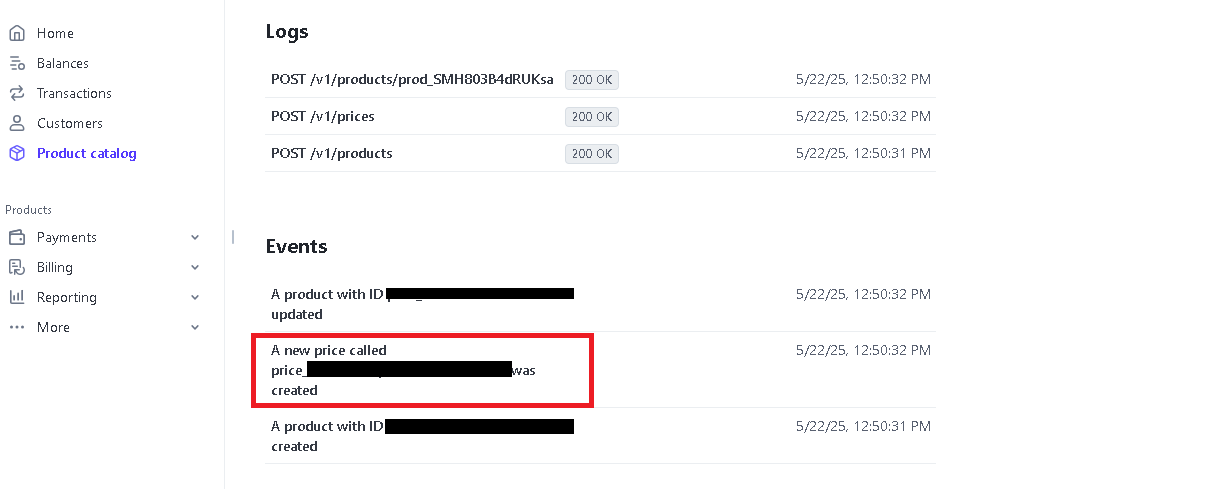
Copy this ID and paste it into the above agent.ts code. Remember to use your actual domain URL in the code.
Creating the cloudflare.ts file
Go to your main project directory and create a file named cloudflare.ts. This is our main Worker code for a Durable Object-based paid tool server using the Model Context Protocol (MCP), Stripe for payment processing, and a KV store for payment state tracking.
We'll first define our imports:
import { McpServer } from "@modelcontextprotocol/sdk/server/mcp.js";
import { StdioServerTransport } from "@modelcontextprotocol/sdk/server/stdio.js";
import { CallToolRequestSchema, ListToolsRequestSchema } from "@modelcontextprotocol/sdk/types.js";
import Stripe from "stripe";
We'll now declare our main class and create a constructor:
export class experimental_PaidMcpAgent extends McpServer {
  private state: DurableObjectState;
  private env: any;
  private toolConfigs: Map<string, any> = new Map();

  constructor(state: DurableObjectState, env: any) {
    super(
      {
        name: "paid-mcp-agent",
        version: "1.0.0"
      },
      {
        capabilities: {
          tools: {}
        }
      }
    );

    this.state = state;
    this.env = env;
  }
This sets up the main MCP server class that extends the base MCP server. It stores Cloudflare Durable Object state, environment variables, and tool configurations.
Next, we'll create a Stripe checkout session:
if (url.pathname === "/create-checkout-session" && request.method === "POST") {
  try {
    const { email, toolName } = await request.json();
    if (!email) throw new Error("Email is required");
    if (!toolName) throw new Error("Tool name is required");

    const toolConfig = this.toolConfigs.get(toolName);
    if (!toolConfig) throw new Error("Unknown tool");

    const stripe = new Stripe(this.env.STRIPE_SECRET_KEY, {
      apiVersion: "2022-11-15"
    });

    const session = await stripe.checkout.sessions.create({
      payment_method_types: ["card"],
      mode: toolConfig.checkout.mode,
      customer_email: email,
      line_items: toolConfig.checkout.line_items,
      success_url: toolConfig.checkout.success_url,
      cancel_url: toolConfig.checkout.cancel_url,
      metadata: {
        email: email,
        toolName: toolName
      }
    });

    return new Response(JSON.stringify({ url: session.url }), {
      status: 200,
      headers: { "Content-Type": "application/json" }
    });
  } catch (error: any) {
    console.error("Checkout session creation error:", error);
    return new Response(JSON.stringify({ error: error.message }), {
      status: 400,
      headers: { "Content-Type": "application/json" }
    });
  }
}
This endpoint creates a Stripe checkout session when payment is required. It validates the request, retrieves the tool configuration, and creates a Stripe session with the appropriate pricing and redirect URLs.
Next, we'll define a Stripe Webhook handler:
if (url.pathname === "/webhook" && request.method === "POST") {
  try {
    const stripe = new Stripe(this.env.STRIPE_SECRET_KEY, {
      apiVersion: "2022-11-15"
    });

    const sig = request.headers.get('stripe-signature');
    if (!sig) throw new Error("No signature");

    const body = await request.text();
    const event = stripe.webhooks.constructEvent(body, sig, this.env.STRIPE_WEBHOOK_SECRET);

    if (event.type === 'checkout.session.completed') {
      const session = event.data.object as any;
      const email = session.metadata?.email;
      const toolName = session.metadata?.toolName;

      if (email && toolName) {
        await this.env.MY_KV.put(`paid:${email}:${toolName}`, "true");
      }
    }

    return new Response(JSON.stringify({ received: true }), {
      status: 200,
      headers: { "Content-Type": "application/json" }
    });
  } catch (error: any) {
    return new Response(JSON.stringify({ error: error.message }), {
      status: 400,
      headers: { "Content-Type": "application/json" }
    });
  }
}
This handles Stripe webhook events. When a payment is completed, it stores the payment status in Cloudflare KV storage using the format paid:{email}:{toolName}.
Next, we'll create an endpoint to check payment status:
if (url.pathname === "/has-paid" && request.method === "GET") {
  const email = url.searchParams.get("email");
  const toolName = url.searchParams.get("toolName");

  if (!email || !toolName) {
    return new Response(JSON.stringify({ error: "Missing email or toolName" }), {
      status: 400,
      headers: { "Content-Type": "application/json" }
    });
  }

  try {
    const paid = await this.env.MY_KV.get(`paid:${email}:${toolName}`);
    return new Response(JSON.stringify({ paid: paid === "true" }), {
      status: 200,
      headers: { "Content-Type": "application/json" }
    });
  } catch (error: any) {
    return new Response(JSON.stringify({ error: error.message }), {
      status: 500,
      headers: { "Content-Type": "application/json" }
    });
  }
}
This endpoint allows checking if a user has paid for a specific tool by querying the KV storage.
Now, we'll write code for the direct tool call handler:
private async handleDirectToolCall(body: any): Promise<Response> {
  try {
    const { tool, params, email } = body;

    // Check if the user has paid for this tool
    if (!email) {
      return new Response(JSON.stringify({
        error: "Email required for paid tools",
        requiresPayment: true,
        toolName: tool,
        message: "Please provide your email to check payment status."
      }), {
        status: 402,
        headers: { "Content-Type": "application/json" }
      });
    }

    const hasPaid = await this.checkPayment(email, tool);
    if (!hasPaid) {
      return new Response(JSON.stringify({
        error: "Payment required",
        requiresPayment: true,
        toolName: tool,
        message: `Payment required for ${tool}. Please contact support to complete payment.`
      }), {
        status: 402,
        headers: { "Content-Type": "application/json" }
      });
    }

    if (tool === "generate_emoji") {
      const result = await this.executeToolWithConfig(tool, params);
      return new Response(JSON.stringify(result), {
        headers: { "Content-Type": "application/json" }
      });
    }

    return new Response(JSON.stringify({ error: "Unknown tool" }), {
      status: 400,
      headers: { "Content-Type": "application/json" }
    });
  } catch (error: any) {
    return new Response(JSON.stringify({ error: error.message }), {
      status: 500,
      headers: { "Content-Type": "application/json" }
    });
  }
}
This handles direct tool calls, checking payment status before executing the tool. It returns a 402 status code if payment is required.
Next, we'll define our paid tool registration method:
protected paidTool(
  name: string,
  description: string,
  schema: any,
  handler: Function,
  paymentConfig: any
) {
  // Store tool configuration
  this.toolConfigs.set(name, {
    handler,
    checkout: paymentConfig.checkout,
    meterEvent: paymentConfig.meterEvent,
    paymentReason: paymentConfig.paymentReason
  });

  this.setRequestHandler(ListToolsRequestSchema, async () => ({
    tools: [
      {
        name,
        description,
        inputSchema: {
          type: "object",
          properties: schema
        }
      }
    ]
  }));

  this.setRequestHandler(CallToolRequestSchema, async (request) => {
    if (request.params.name === name) {
      try {
        // Payment check will be handled by the transport layer
        return await handler(request.params.arguments);
      } catch (error: any) {
        throw new Error(`Tool execution failed: ${error.message}`);
      }
    }
    throw new Error(`Unknown tool: ${request.params.name}`);
  });
}
This method registers a paid tool with its configuration, including payment settings and the tool handler. It sets up MCP request handlers for listing tools and calling them.
Now, we'll define the HTTP MCP Transport class:
class HttpMcpTransport {
  private request: Request;
  private responseResolve?: (response: Response) => void;
  private responsePromise: Promise<Response>;
  private server: experimental_PaidMcpAgent;

  constructor(request: Request, server: experimental_PaidMcpAgent) {
    this.request = request;
    this.server = server;
    this.responsePromise = new Promise((resolve) => {
      this.responseResolve = resolve;
    });
  }
This class handles HTTP-based MCP communication, converting HTTP requests to MCP protocol messages.
Finally, we'll define an MCP Message Handler with a payment check:
if (message.method === "tools/call") {
  if (message.params.name === "generate_emoji") {
    const { email, object } = message.params.arguments;

    // Check if email is provided
    if (!email) {
      return {
        jsonrpc: "2.0",
        id: message.id,
        error: {
          code: -32602,
          message: "Email is required for paid tools. Please provide your email to check payment status."
        }
      };
    }

    // Check payment status
    const hasPaid = await this.server.checkPayment(email, "generate_emoji");
    if (!hasPaid) {
      return {
        jsonrpc: "2.0",
        id: message.id,
        error: {
          code: -32602,
          message: `Payment required for emoji generation. Please contact support to complete payment for email: ${email}. Tool: generate_emoji`
        }
      };
    }

    // Only generate emoji if payment is confirmed
    const result = await this.generateEmoji({ object });
    return {
      jsonrpc: "2.0",
      id: message.id,
      result
    };
  }
}
This handles MCP tool calls, checking payment status before executing the emoji generation tool.
You can finde the complete code here
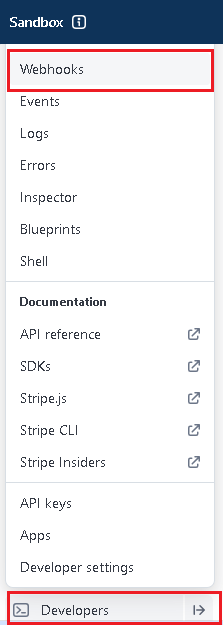
Here, we’ll need to create a Webhook endpoint and get our Stripe Webhook secret key for the Stripe Webhook hanlder that we created above. To do so, go to your Stripe dashboard, click on developers, and then select Webhooks:
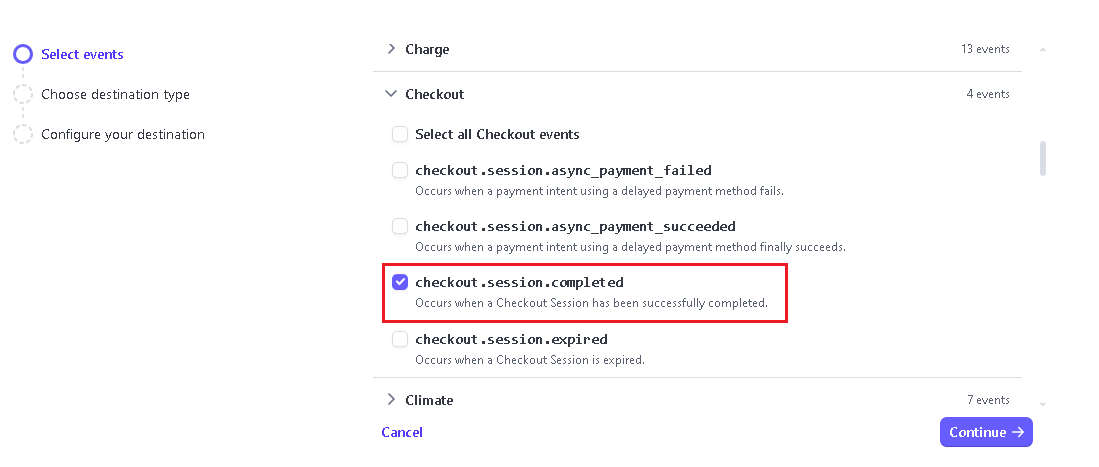
Then click ‘add destination’ and select Events to send: checkout.session.completed:
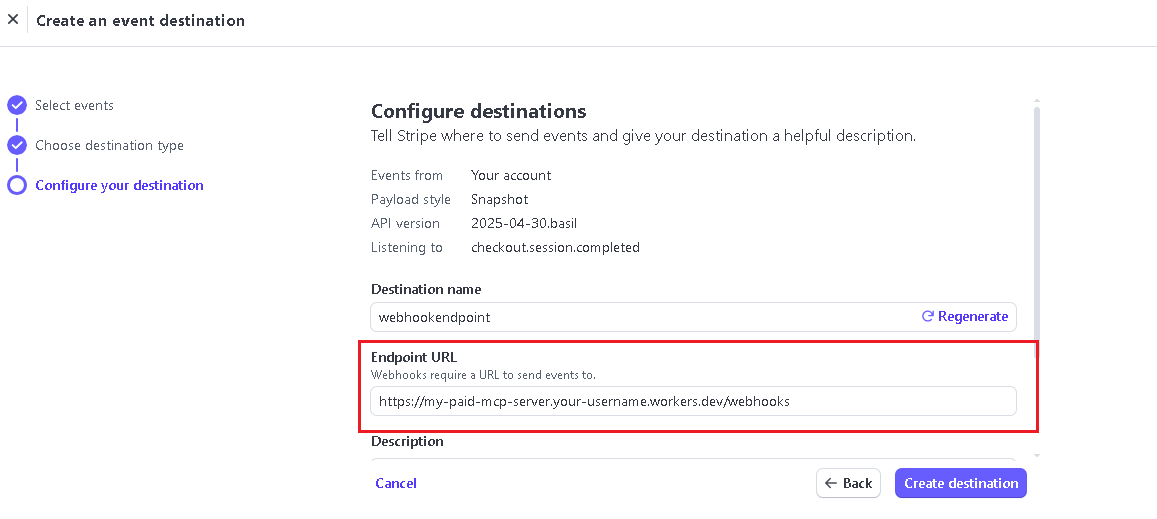
Now, enter your endpoint URL and click ‘create destination’
Once you add the webhook, click on it in the list--you’ll see a section labeled Signing secret. Copy it and put it in your .env file like this
STRIPE_WEBHOOK_SECRET=Your_webhook_key
Or in terminal (recommended for production deployment)
npx wrangler secret put WEBHOOK_SECRET
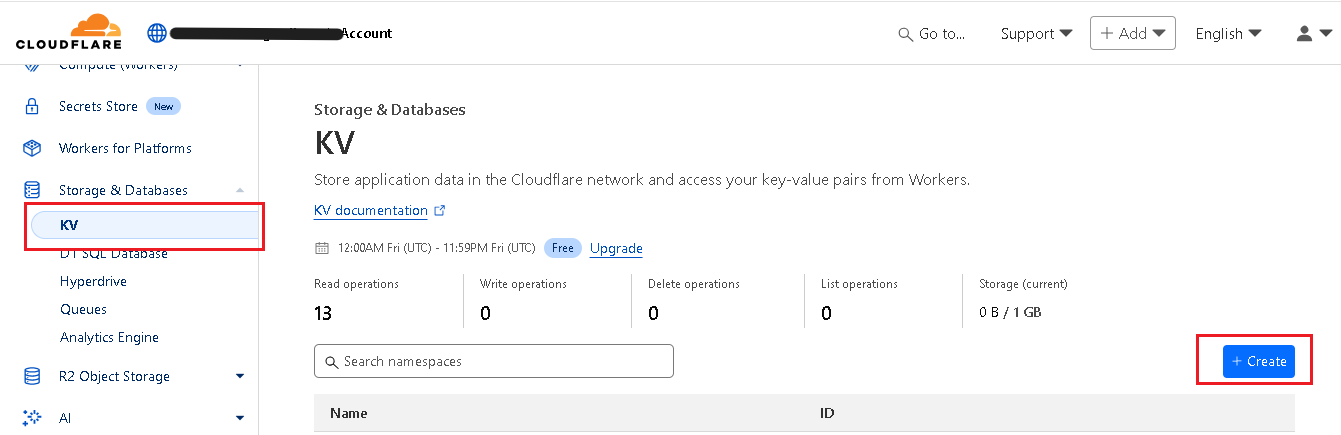
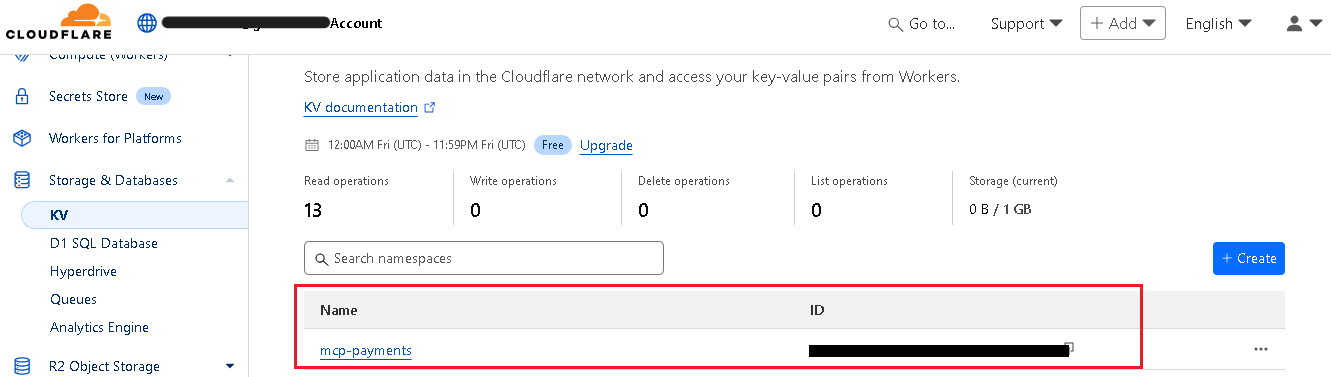
You’ll also need to create a KV namespace. It helps with tracking which users have paid for access and storing session tokens after Stripe checkout. To create your KV namespace, go to your Cloudflare dashboard and click ‘KV’ under ‘Storage & Databases’. Then click ‘create’:
Enter the name for your KV namespace and click create. Now, copy the ID:
Updating wrangler.toml
Open your wrangler.toml file in your code editor and put the following code in it:
name = "your domain name"
main = "src/index.ts"
type = "module"
compatibility_date = "2025-05-22"

[[kv_namespaces]]
binding = "MY_KV"
id = "Your_KV_ID"
preview_id = "your-preview-kv-namespace-id"

[vars]
STRIPE_SECRET_KEY = "sk_test_fake_placeholder"

[[durable_objects.bindings]]
name = "PaidMcpAgent"
class_name = "PaidMcpAgent"

compatibility_flags = [
  "nodejs_compat",
  "global_fetch_strictly_public"
]

[[migrations]]
tag = "v1"
new_sqlite_classes = ["PaidMcpAgent"]
Deploying your Server
In your terminal, run:
Wrangler deploy
You’ll see something like this in your terminal:
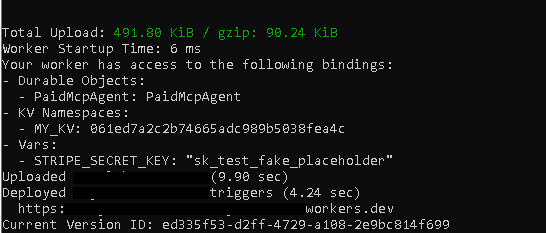
Your MCP server is now deployed successfully on Cloudflare workers.
Connecting our MCP Server to Claude
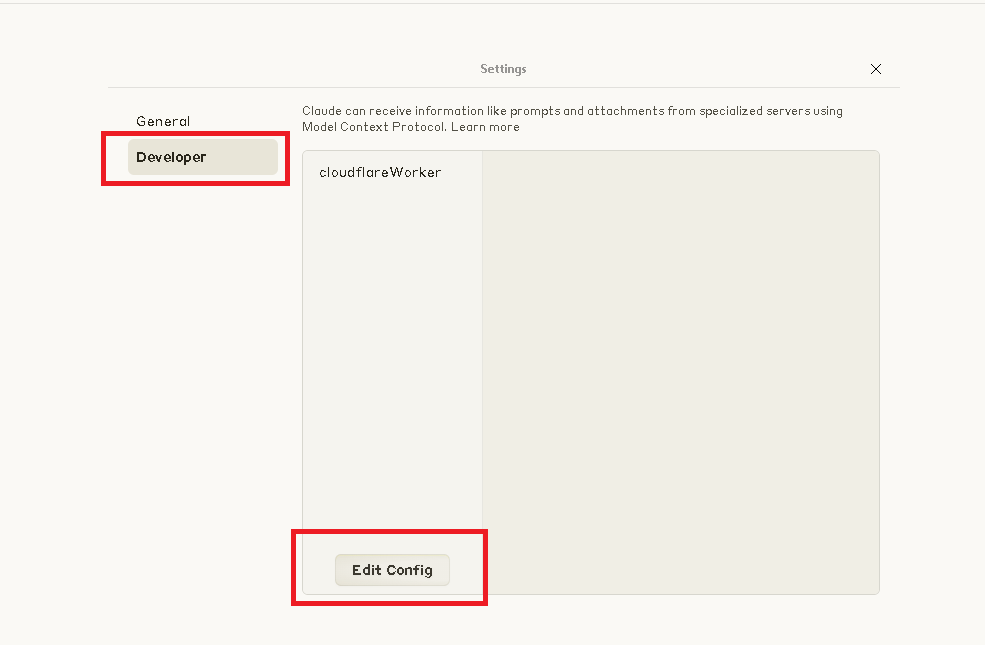
Open the Claude Desktop, then → Files → Setting → Developers → Edit Config:
Now open the claude_desktop_config file in your code editor and put the following code in it:
 "mcpServers": {
    "cloudflareWorker": {
      "command": "npx",
      "args": [
        "mcp-remote",
        "https://https://your-domain.workers.dev/sse"
      ]
    }
  }
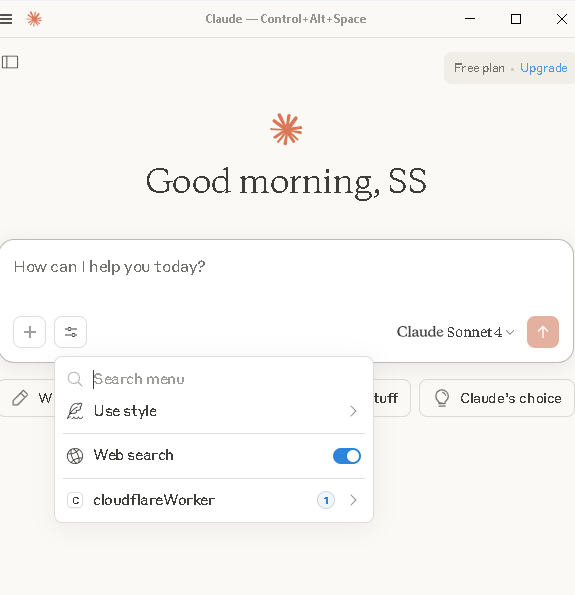
This code will connect our MCP server to Claude. Once you add this code, restart Claude. You’ll now see your MCP server in options:
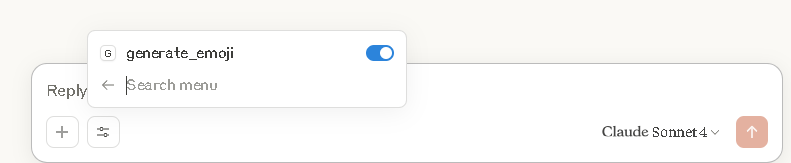
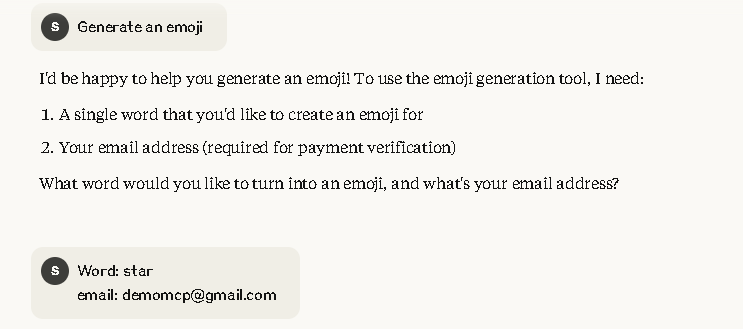
Now, when we send a prompt to Claude to generate an emoji, it will provide a response like this:
Testing Stripe Checkout Session in Browser
Since we've also created a web interface for our tool in our index.ts file, it'll show us a web page with an HTML form when we open our Cloudflare domain in the browser:
When we click "Generate Emoji", it'll take us to a 'Payment Required' page:
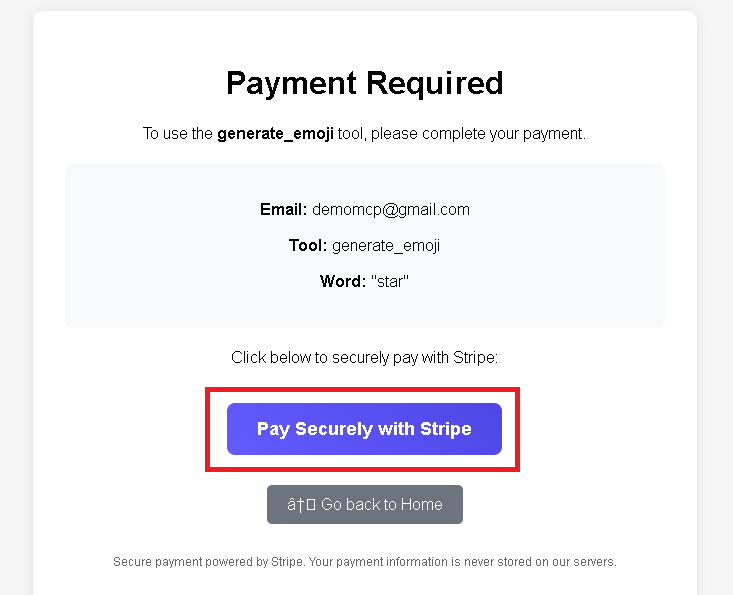
Now, when we click the "Pay Securely with Stripe" button, it'll take us to the Stripe checkout page:
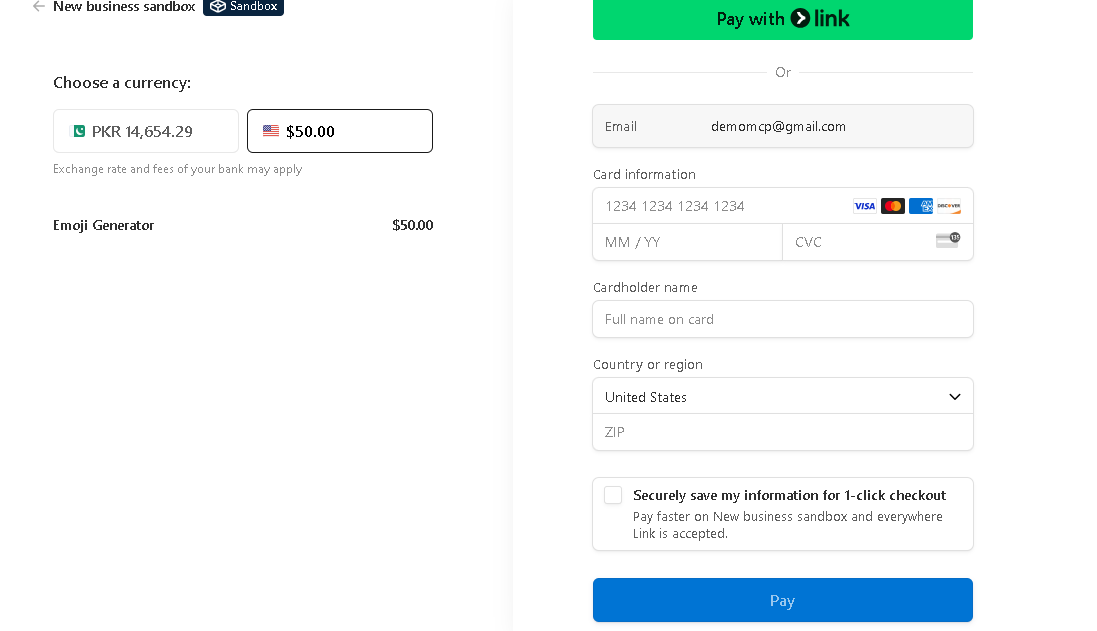
You can enter a Stripe test card number and expiry date, and click Pay. This will take you to the payment successful page.
Testing Stripe Checkout Session in Terminal
You can test your Stripe checkout session in your terminal using the following curl test:
curl https://api.stripe.com/v1/checkout/sessions \
  -u sk_test_: \
  -d success_url="https://example.com/success" \
  -d cancel_url="https://example.com/cancel" \
  -d "line_items[0][price]"="price_1RRYZwBCplZMEafG4AFa7QzD" \
  -d "line_items[0][quantity]"=1 \
  -d mode=payment
It’ll return something like this:
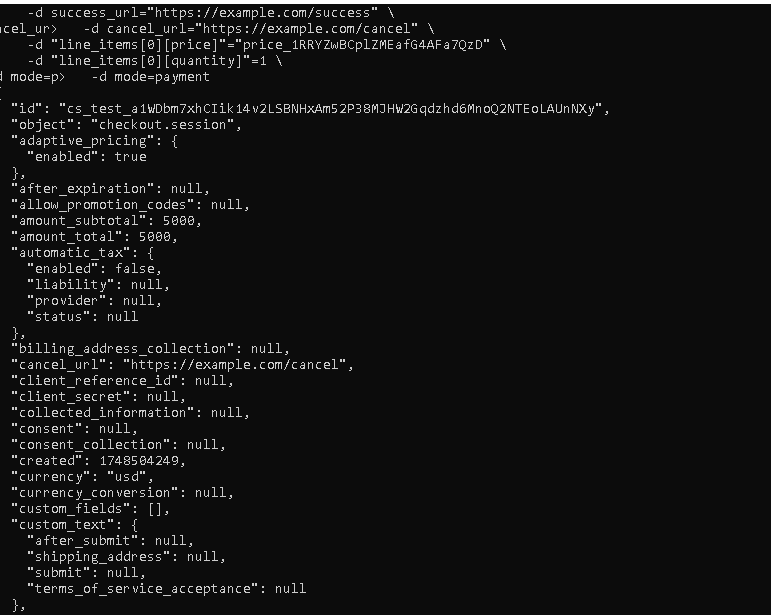
It’ll also return a URL:

When you put this URL in your browser, it’ll take you to your Stripe Checkout page:

Conclusion
The Model Context Protocol (MCP) makes it easier for developers to connect external tools and data sources to AI agents. It’s rapidly gaining popularity due to its huge benefits, with several new MCP servers being introduced every month.
One of the ways you can utilize MCP is to monetize tool usage. For example, you can create a translation tool and connect it to an AI agent like Claude through the MCP (Stripe agent toolkit Cloudflare) to require payments before users can access it.
So, when a user asks Claude to translate a text, it asks the user to first complete the payment through Stripe. In this article, you can learn to build such a server by following a step-by-step guide.