MCP Sampling Explained: Adding Intelligence to Your MCP Servers
When building applications with the Model Context Protocol (MCP), you’ll quickly discover three core parts: Resources, Tools, and Prompts. These parts allow MCP servers to provide data, functionality, and structured guidance to clients. But what happens when your server needs to make a complex decision or understand context beyond simple rules? That’s where you’ll find sampling pretty helpful.
What is MCP Sampling?
MCP sampling flips the normal client-server relationship. In typical MCP interactions, the client (like Claude Desktop) initiates requests to servers (like Github or filesystem integration). Sampling works differently.
Sampling enables MCP servers to request Large Language Model (LLM) completions from clients. Your server can ask the AI model to:
- Analyze data it has collected
- Make decisions based on context
- Generate structured content in specific formats
- Solve multi-step problems with reasoning
The client (which controls access to the language model) manages these requests, often with human approval at key checkpoints.Thus, MCP sampling enables human feedback to the output created by LLMs, providing seamless workflow between the client and server.
The Complete Sampling Flow
Let’s walk through exactly how sampling works:
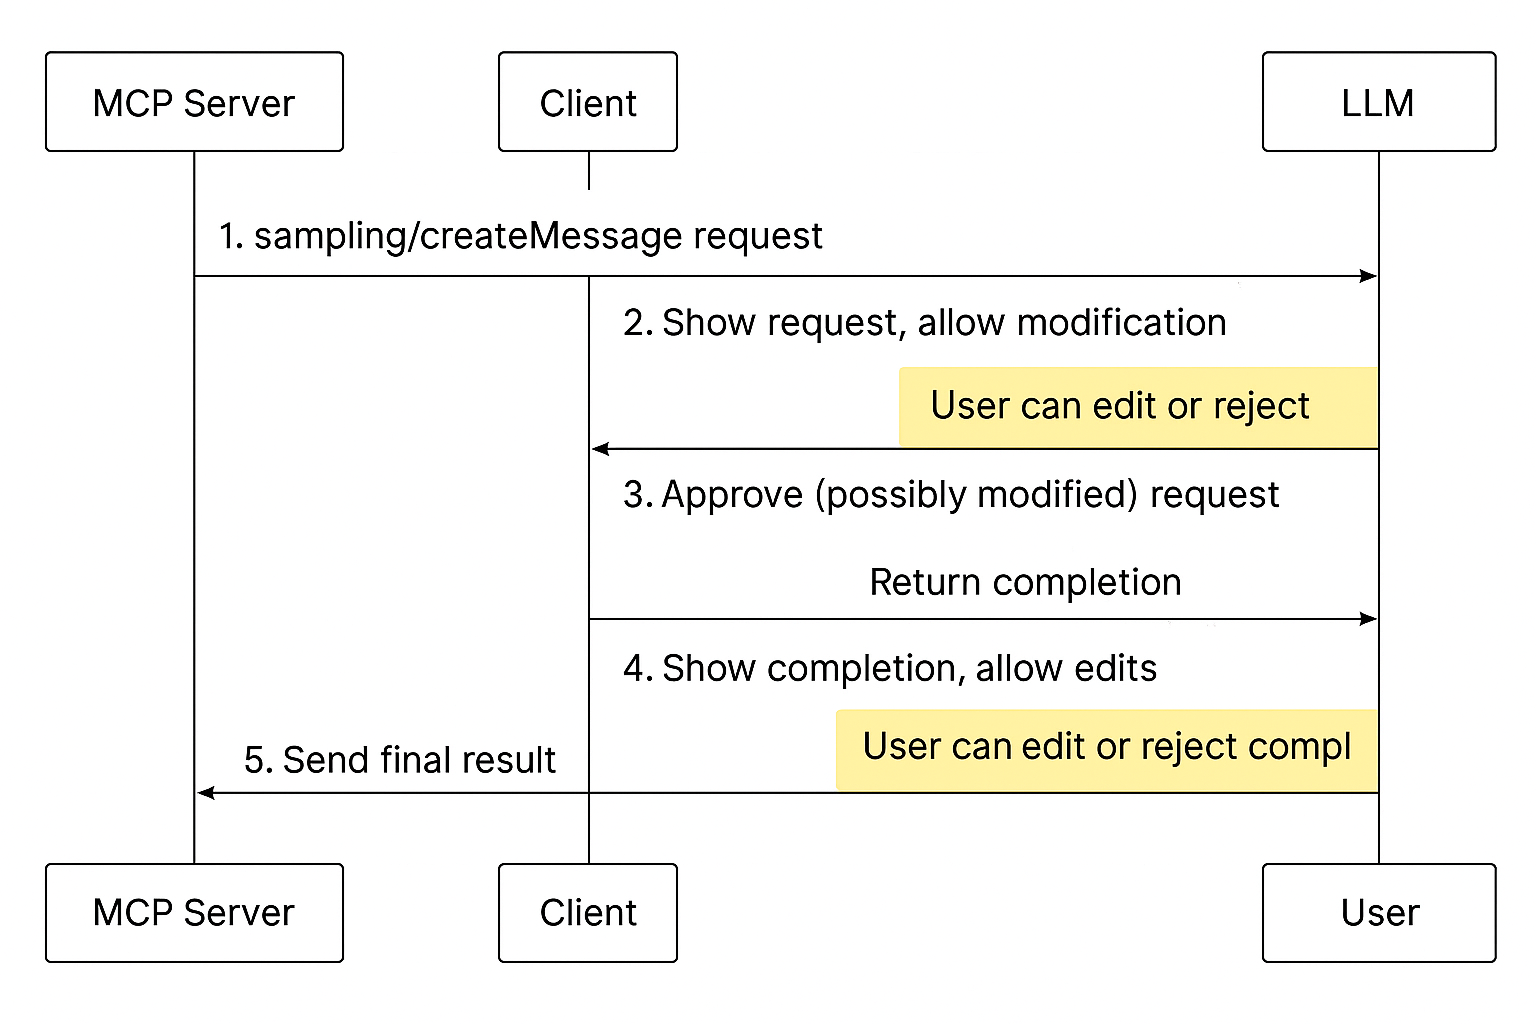
- Your MCP server sends a
sampling/createMessagerequest with prompts, optional system instructions, model preferences, and context requirements. - The client (e.g., Claude Desktop) receives this request, validates it, and shows the user what the server wants to ask the LLM. The user can edit, approve, or reject the prompt.
- If approved, the client sends the prompt to the language model, receives a completion, and shows it to the user. Again, the user can edit, approve, or reject the completion.
- The client returns the approved completion to the server as a response to the original request.
- Your server can then use this AI-generated content to continue its operation, possibly making further sampling requests later.
This flow keeps humans in control while allowing servers to use AI capabilities.
Understanding the Sampling Request Format
A complete sampling request in MCP contains several key components. Let’s explore a typical sampling request structure below:
{
  messages: [
    {
      role: "user" | "assistant",
      content: {
        type: "text" | "image" | "audio",
        text?: string,           // For text content
        data?: string,           // Base64 encoded for image/audio
        mimeType?: string        // Required for image/audio
      }
    }
    // More messages can be included for conversation context
  ],
  modelPreferences?: {
    hints?: [{
      name?: string           // E.g., "claude-3-sonnet", "gpt-4"
    }],
    costPriority?: number,    // 0-1 scale (higher = more cost-sensitive)
    speedPriority?: number,   // 0-1 scale (higher = faster response preferred)
    intelligencePriority?: number  // 0-1 scale (higher = more capable model)
  },
  systemPrompt?: string,      // Instructions for model behavior
  includeContext?: "none" | "thisServer" | "allServers", // MCP context to include
  temperature?: number,       // 0-1 scale for randomness (lower = more deterministic)
  maxTokens: number,          // Maximum response length
  stopSequences?: string[],   // Sequences that end generation early
  metadata?: Record<string, unknown> // Additional parameters
}
Let’s break down the key elements:
Messages
The messages array contains the conversation history that will be sent to the LLM. Each message includes a role (user or assistant) and content (text, image, or audio).
For models like Claude 3, you can include images by adding image content with base64-encoded data.
Model Preferences
The modelPreferences object enables your server to influence model selection without specifying an exact model. You can suggest preferred models (e.g., claude-3-sonnet) while letting the client make the final choice. The priority values help the client balance between cost, speed, and intelligence when selecting a model.
Including Context
The includeContext field brings in additional MCP context:
none: No additional context (default)thisServer: Include context from the requesting serverallServers: Include context from all connected MCP servers
This helps language models understand the broader environment when responding.
The Response Format
When the client returns a response, it follows the below structure:
{
  model: string,          // Name of the model used (e.g., "claude-3-sonnet-20240229")
  stopReason?: "endTurn" | "stopSequence" | "maxTokens" | string, // Why generation ended
  role: "assistant",      // Always "assistant" for LLM responses
  content: {
    type: "text" | "image" | "audio",
    text?: string,        // For text responses
    data?: string,        // Base64-encoded for image/audio
    mimeType?: string     // Required for image/audio
  }
}
This standard format makes it easy to parse and use the LLM’s output in your server logic.
Building a Server That Uses Sampling
In this section, you'll build a fully working MCP server that uses the sampling/createMessage protocol method to generate responses from a language model through an MCP client. The server won’t need any direct LLM API keys. Instead, it asks the client to handle model access, approval, and delivery.
In this project, the server acts like a code review assistant. It sends a simple JavaScript function to the MCP client and requests LLM suggestions for improving it. The sampling is done with the user’s permission and oversight, fulfilling the human-in-the-loop requirement of the protocol.
1. Create the Project Directory
Create and initialize a new project folder:
$ mkdir code-review-server
$ cd code-review-server
$ npm init -y
2. Install Dependencies
Install the MCP SDK and TypeScript-related packages:
$ npm install @modelcontextprotocol/sdk
$ npm install -D typescript @types/node
3. Configure TypeScript
Create a default TypeScript config file:
$ npx tsc --init
Then replace the contents of tsconfig.json with this minimal setup for MCP:
{
  "compilerOptions": {
    "target": "ES2022",
    "module": "Node16",
    "moduleResolution": "Node16",
    "outDir": "./dist",
    "rootDir": "./src",
    "strict": true,
    "esModuleInterop": true
  },
  "include": ["src/**/*"]
}
4. Update Scripts in package.json
Add build and start commands so you can run the server easily:
"scripts": {
  "build": "tsc",
  "start": "node dist/index.js"
}
5. Set Up Project Structure
Create your source folder and entry file:
$ mkdir src
$ touch src/index.ts
6. Implement the Code Reviewer Server
Paste the following code into src/index.ts. It defines the code to review, constructs a sampling request, and prints the LLM’s suggestion when the client responds.
import { Server } from "@modelcontextprotocol/sdk/server/index.js";
import { StdioServerTransport } from "@modelcontextprotocol/sdk/server/stdio.js";
import {
  SubscribeRequestSchema,
  CreateMessageRequest,
  CreateMessageResultSchema,
} from "@modelcontextprotocol/sdk/types.js";

const server = new Server(
  { name: "code-review-server", version: "1.0.0" },
  { capabilities: {} }
);

const codeToReview = `function greet(name) {
  if (name) {
    return 'Hello, ' + name;
  } else {
    return 'Hello, guest!';
  }
}`;

const requestSampling = async () => {
  const request: CreateMessageRequest = {
    method: "sampling/createMessage",
    params: {
      messages: [
        {
          role: "user",
          content: {
            type: "text",
            text: codeToReview
          }
        }
      ],
      systemPrompt: "You are a senior JavaScript developer. Suggest code improvements.",
      maxTokens: 150,
      temperature: 0.4,
      includeContext: "thisServer"
    }
  };

  try {
    const result = await server.request(request, CreateMessageResultSchema);
    console.log("\\n=== LLM Code Review Suggestion ===\\n" + result.content?.text + "\\n=================================\\n");
  } catch (error) {
    console.error("Sampling request failed:", error);
  }
};

server.setRequestHandler(SubscribeRequestSchema, async () => {
  await requestSampling();
  return {};
});

const transport = new StdioServerTransport();
server.connect(transport);
console.error("Code Review Sampling Server is running...");
7. Build and Run the Server
First, compile the TypeScript code:
$ npm run build
Then start the server:
$ npm start
When your client sends a subscribe message, the server immediately sends the sample code to be reviewed by the LLM through the client.
8. Sample Request and Response
Here’s the actual request format sent to the client:
{
  "method": "sampling/createMessage",
  "params": {
    "messages": [
      {
        "role": "user",
        "content": {
          "type": "text",
          "text": "function greet(name) { if (name) { return 'Hello, ' + name; } else { return 'Hello, guest!'; } }"
        }
      }
    ],
    "systemPrompt": "You are a senior JavaScript developer. Suggest code improvements.",
    "includeContext": "thisServer",
    "maxTokens": 150,
    "temperature": 0.4
  }
}
A valid client will return something like:
{
  "model": "gpt-4",
  "stopReason": "endTurn",
  "role": "assistant",
  "content": {
    "type": "text",
    "text": "function greet(name = 'guest') { return `Hello, ${name}!`; }"
  }
}
User Interaction Flow
The user controls the flow at the client side. Here's what happens:
- Server sends request: The server sends a structured request to the client.
- Client reviews prompt: The client presents the request to the user.
- User approves or edits: The user can edit or reject the prompt before sending.
- Client contacts LLM: If approved, the client sends it to the LLM.
- LLM responds: The client receives the completion.
- User reviews again: The client shows the output to the user for final review.
- Final result: The approved result is returned to the server.
MCP sampling enables a secure, explainable, and user-controlled interaction between your server and powerful LLMs. With just a few lines of code, you’ve:
- Triggered LLM responses without managing API keys
- Ensured the user can inspect, edit, or reject prompts and responses
- Built a real agentic pattern with user-supervised AI
You can now build intelligent agents that operate responsibly under user direction—exactly what MCP was designed to support.
Integration with Other MCP Features
Sampling works best when combined with other MCP features. You can use resources to read data, then use sampling to analyze it. You can use sampling to decide what tool to call and with what parameters. You can also allow users to trigger workflow that include sampling steps via prompts.
For example, a Git MCP server might read commit history via resources, use sampling to analyze patterns and suggest improvements. Then, it can use tools to apply those suggestions if approved.
Conclusion
MCP Sampling changes how we build smart applications. It enables servers to request AI completions through clients. As a result, sampling creates a new tool that combines server-side functionality with AI reasoning capabilities.
As MCP protocol continues to grow, sampling will likely gain new capabilities such as::
- Better streaming support for real-time responses
- More detailed model control settings
- Better context handling for larger documents
- More multimodal capabilities (audio, video)
As you develop MCP applications, think about where sampling could make your server smarter. It doesn’t matter whether you’re building code analyzers, data pipelines, or decision support tools, sampling opens new ways to create truly intelligent integrations.