How to Set Up MCP Servers Locally Using Docker: A Step-by-Step Guide
Introduction
Model Context Protocol (MCP) is a secure framework introduced by Anthropic that enables AI assistants to safely interact with external tools and data sources. By setting up MCP servers locally, you can empower coding assistants like Claude Desktop, Windsurf (Cascade), or Cursor to access your local filesystem, perform live web searches, or query databases securely.
This guide walks you through installing and configuring essential MCP Servers using Docker — with full support for both Windows and macOS.
Table of Contents
- Introduction
- Prerequisites
- Platform Setup
- Setting Up MCP Servers
- Build MCP Server Images with Docker
- Setting Up Claude to Use MCP Servers
- Kicking the Tyres: Testing Your Setup
- Common Troubleshooting
- Security Best Practices
- Conclusion and What's Next?
Introduction
AI coding assistants are powerful, but connecting them to real-world data amplifies their capabilities. Imagine your AI being able to:
- Open and edit local files
- Perform up-to-date internet searches
- Run SQL queries on your databases
By setting up local MCP servers, you keep control over what resources are exposed while giving your AI superpowers.
Let's dive in! 🚀
Prerequisites
Before proceeding, make sure you have:
- WSL2 & Ubuntu (Windows Only)
- Docker Desktop installed (for Windows/macOS)
- MCP-compatible client (Claude Desktop, Cursor, Windsurf)
- Brave Search API Key (optional for internet search)
- Postgres Database credentials (optional for database integration)
Platform Setup
🪟 Windows (WSL2 + Ubuntu + Docker Desktop)
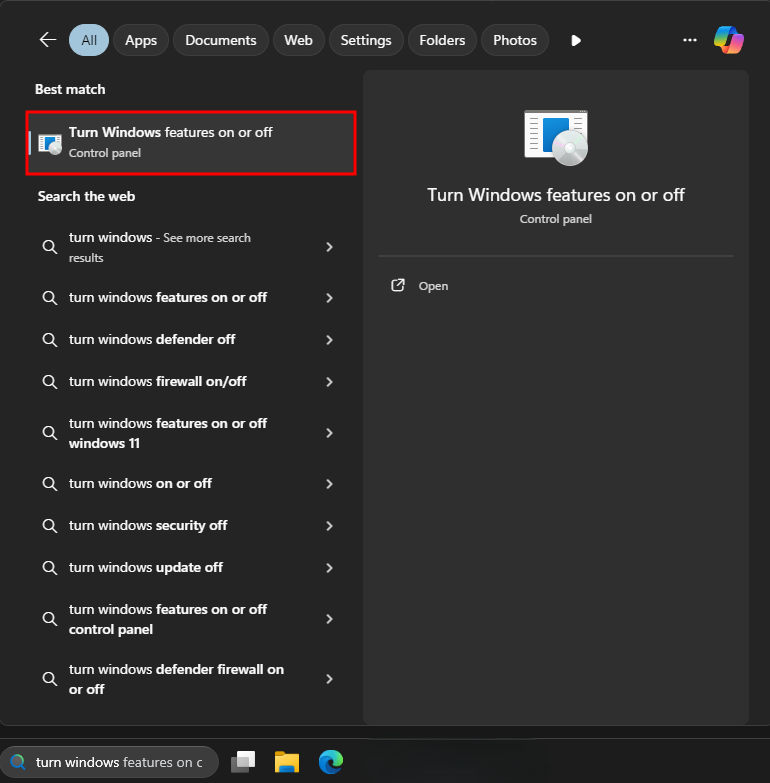
From the Start menu in Windows 10/11, search for "Turn Windows features on or off" and select it.
You need to enable two options here:
- Virtual Machine Platform
- Windows Subsystem for Linux
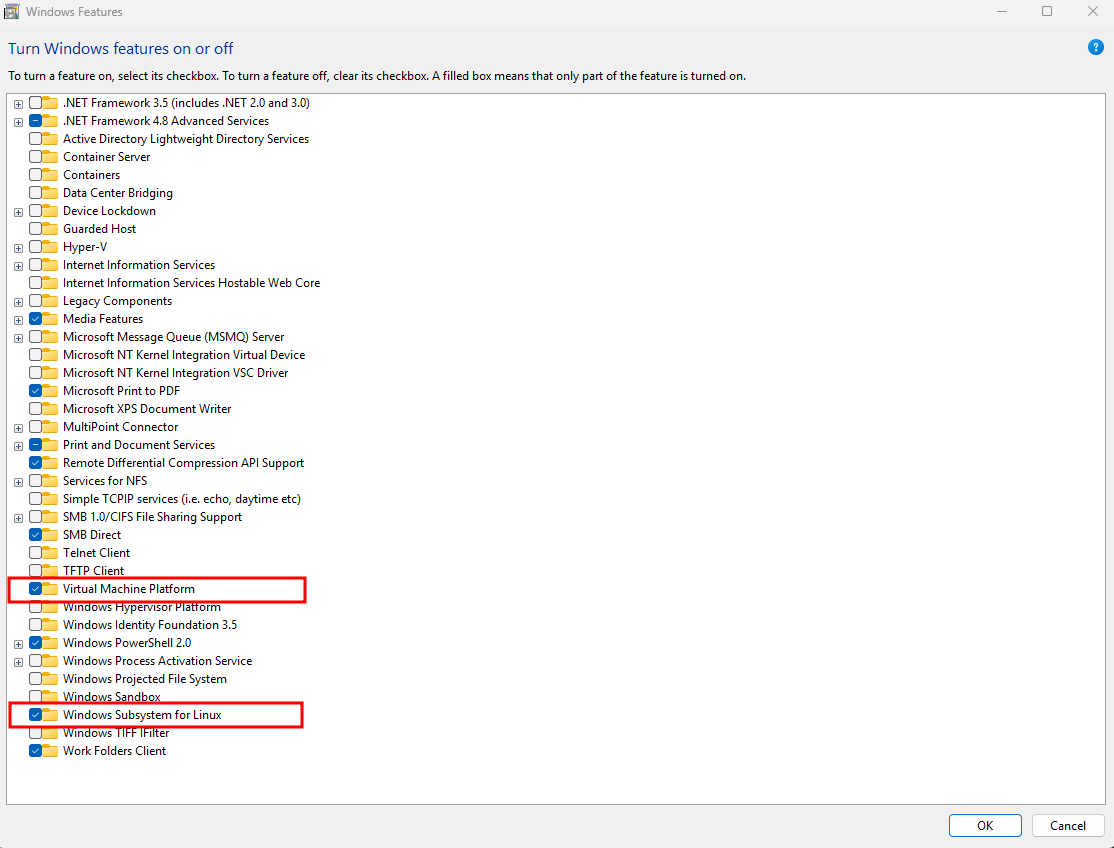
Apply the changes, and the system will prompt you to restart!
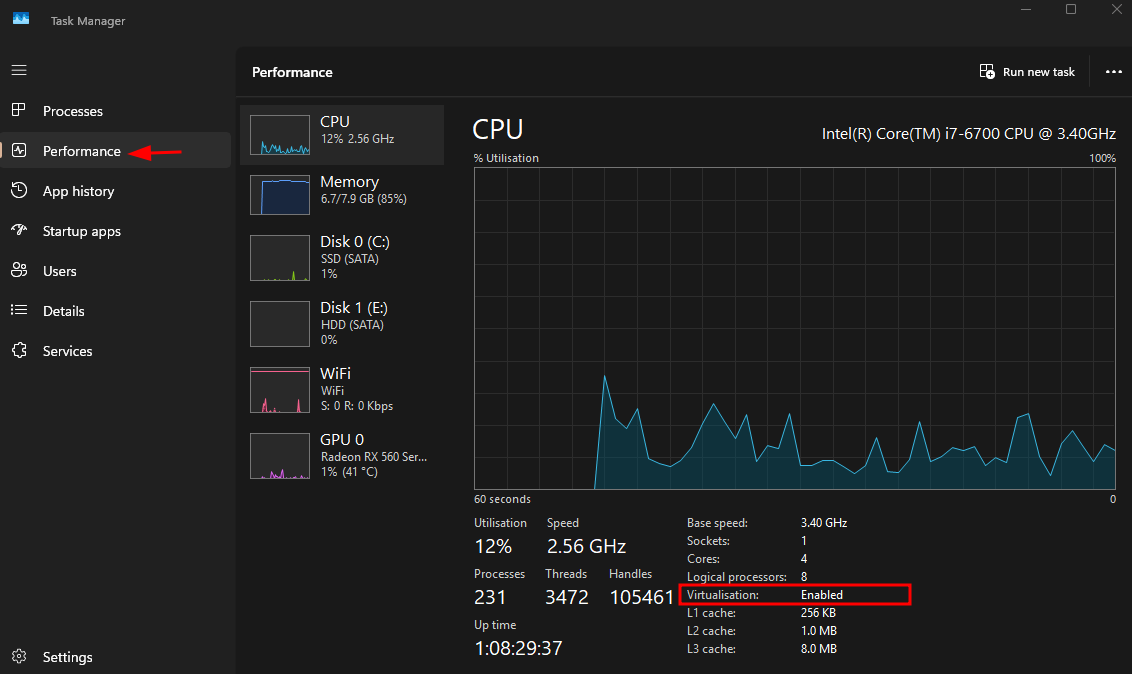
Note: You must enable virtualization from the BIOS.
To check if virtualization is enabled, open Task Manager and look under the Performance tab!
-
Open PowerShell as Administrator and run the following commands:
wsl --version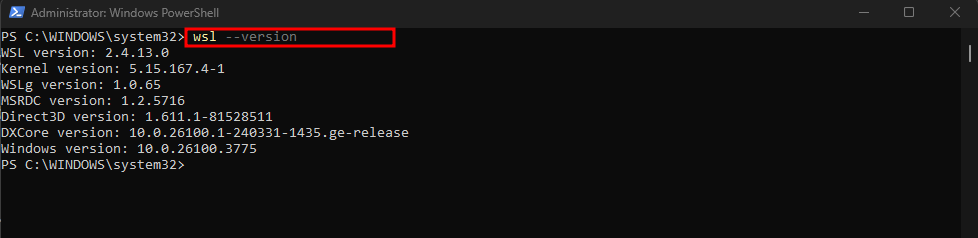
wsl --install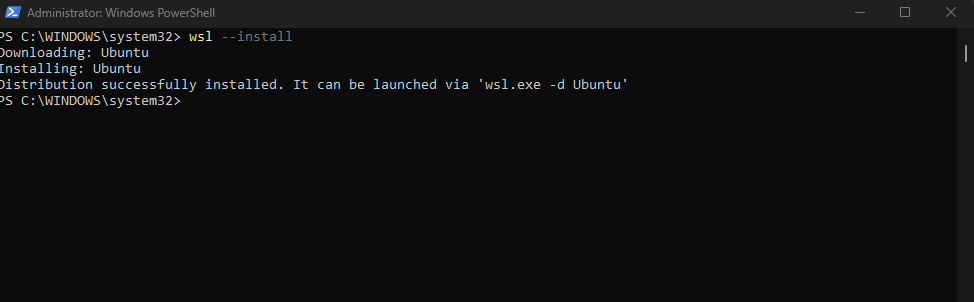
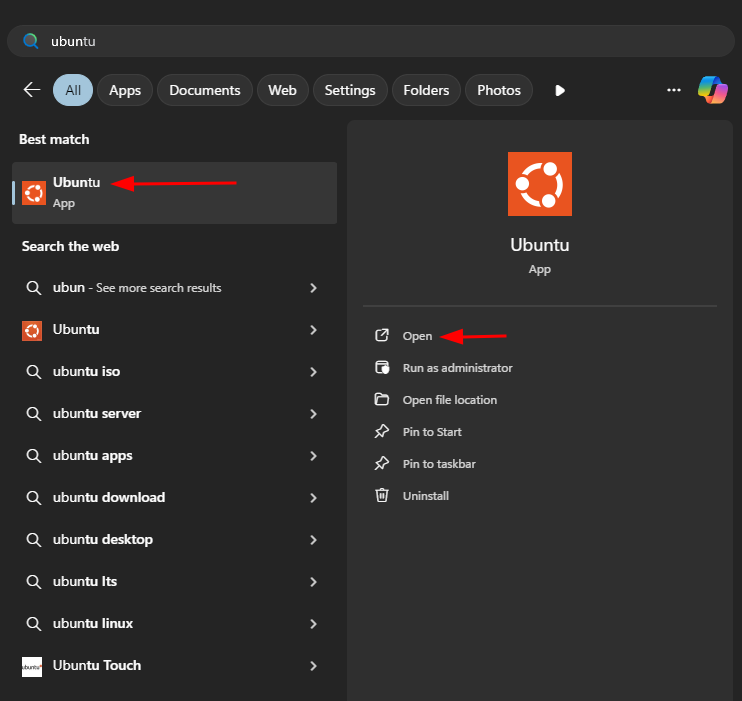
Now that Ubuntu is installed, you can open it directly from the Start Menu. Provide a username and password.
-
Download and install Docker Desktop for Windows.
-
Start Docker Desktop from the Start Menu.
-
Enable WSL2 integration for Docker Desktop.
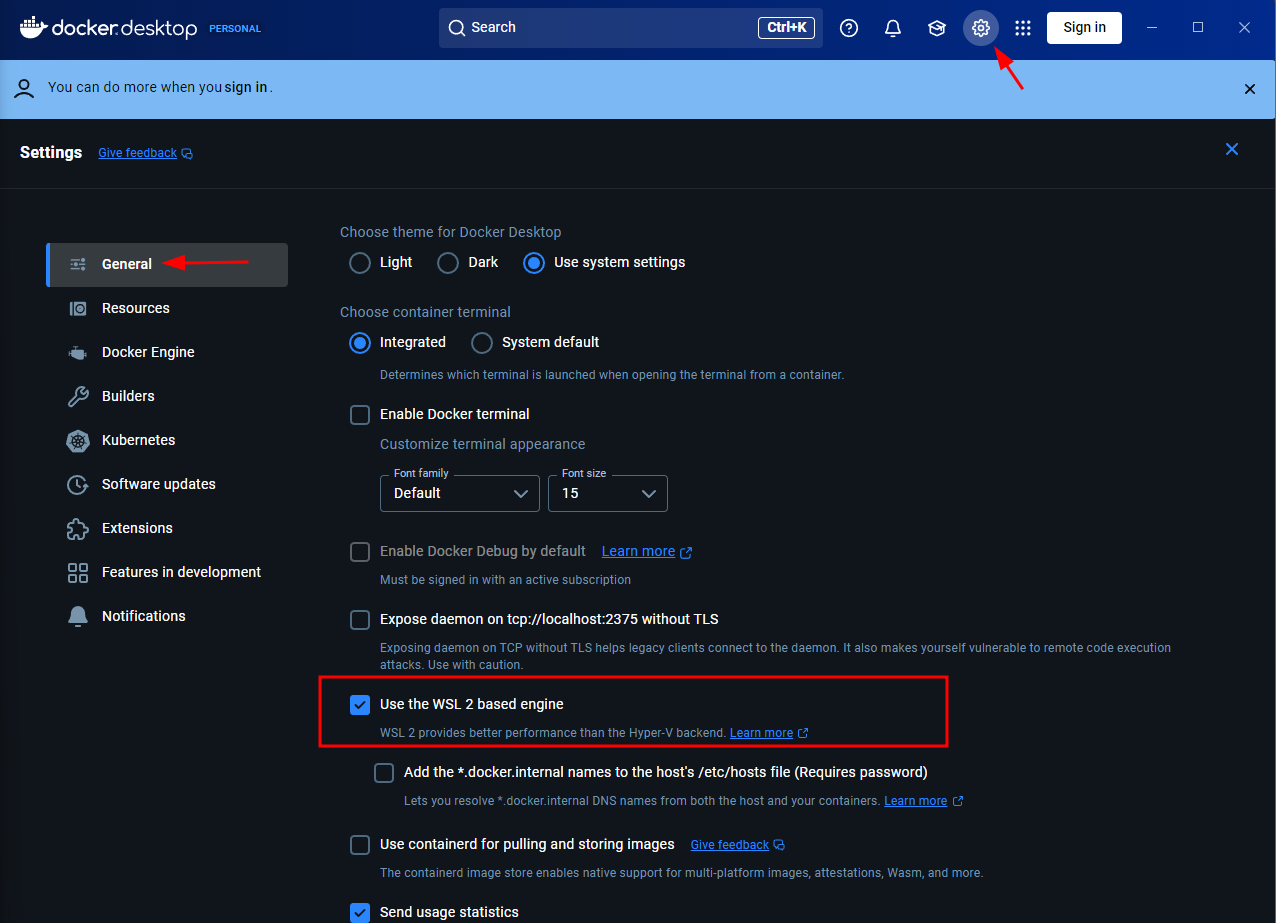
-
Enable Ubuntu in Docker Desktop.

-
Apply & restart Docker Desktop.
-
Test Docker Desktop using Ubuntu terminal in Windows :
docker run hello-world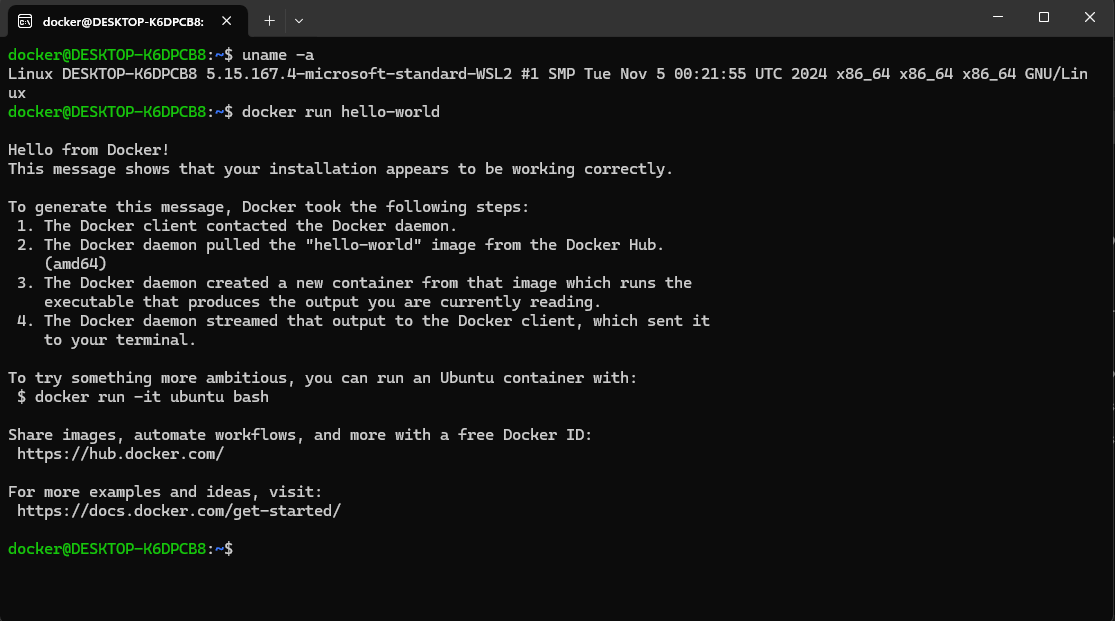
🍎 macOS
-
Download and install Docker Desktop for Mac.
-
Start Docker Desktop from the Applications menu.
-
Verify Docker installation using the terminal:
docker run hello-world
Linux Note: Follow the macOS instructions if you're setting up on Linux.
Setting Up MCP Servers
We will configure multiple MCP servers such as Filesystem, Brave Search, PostgreSQL, and others.
Each server runs as an isolated Docker container that your AI client can launch automatically.
Below is a list of the MCP servers we will set up:
| MCP Server | Description | Notes / Environment Variables |
|---|---|---|
| Git | Git repository access and operations | None |
| Time | Time and timezone utilities | None |
| Sqlite | SQLite database interactions | None |
| Fetch | Web content fetching and parsing | None |
| Sequential Thinking | Dynamic thought sequence problem-solving | None |
| Puppeteer | Browser automation and web scraping | DOCKER_CONTAINER=true |
| PostgreSQL | PostgreSQL database access | Connection string: postgresql://host.docker.internal:5432/mydb |
| Memory | Persistent knowledge graph memory | None |
| Google Maps | Location services and directions | GOOGLE_MAPS_API_KEY=YOUR-KEY-HERE |
| Filesystem | Secure local file system operations | Folder bind mount required: /Users/YOUR_FOLDER/bot-env -> /projects/bot-env |
| Brave Search | Web and local search via Brave API | BRAVE_API_KEY=YOUR-KEY-HERE |
Build MCP Server Images with Docker
Follow these steps based on your operating system:
🐧 Windows (WSL2 Ubuntu) and 🖥️ macOS Users
-
Clone the Repository
Clone the MCP servers repository to your local machine:git clone https://github.com/modelcontextprotocol/servers.git -
Navigate to the Repository Directory: Change directory to the cloned repository:
cd servers -
Create a new file: Create a build_all.sh file in the root directory of the project and paste the following content:
#!/bin/bash set -euo pipefail # Determine the directory of this script so that relative paths are correct SCRIPT_DIR=$(cd "$(dirname "${BASH_SOURCE[0]}")" && pwd) DOCKER_SRC_DIR="$SCRIPT_DIR/src" # Loop over each subdirectory inside the src folder for folder in "$DOCKER_SRC_DIR"/*; do if [ -d "$folder" ]; then folder_name=$(basename "$folder") # Skip 'redis' folder if [ "$folder_name" == "redis" ]; then echo "Skipping '$folder_name': Redis does not require build" continue fi dockerfile="$folder/Dockerfile" if [ -f "$dockerfile" ]; then # If Dockerfile references uv.lock, ensure the file exists in the project folder if grep -q "uv\.lock" "$dockerfile"; then if [ ! -f "$folder/uv.lock" ]; then echo "Skipping '$folder_name': Dockerfile references uv.lock but file not found in $folder" continue fi fi # Determine build context: # If the Dockerfile contains "COPY src/<folder_name>", it expects to be run from the repository root. if grep -E -q "COPY[[:space:]]+src/${folder_name}\b" "$dockerfile"; then context="$SCRIPT_DIR" echo "Building Docker image for '$folder_name' using $dockerfile with repository root as context" else context="$folder" echo "Building Docker image for '$folder_name' using $dockerfile with project folder as context" fi docker build -t "$folder_name" -f "$dockerfile" "$context" else echo "Skipping '$folder_name': Dockerfile not found" fi fi done -
Make the Script Executable
Grant execute permissions to the shell script:chmod +x build_all.sh -
Run the Script with
sudoThe
build_all.shscript needs to be run with root access (sudo) because it builds Docker images, which require elevated permissions.
Ensure your user account has the necessary privileges.When you run the script, it will:
- Automatically detect each MCP server directory under the
src/folder. - Check if a valid
Dockerfileexists for that server. - Verify if any additional dependencies (like
uv.lock) are required. - Select the correct Docker build context (either the project root or the individual service folder).
- Build a Docker image for each MCP server and tag it with the server name (e.g.,
git,fetch,filesystem,brave-search, etc.).
⚡ Note: This process will sequentially build multiple images. The time it takes depends on your machine's resources and internet speed (for downloading base images).
To run the script:
sudo ./build_all.shWhile the script is running, you may encounter multiple errors. Specifically, if you encounter an error like:
ERROR [internal] load metadata for ghcr.io/astral-sh/uv:python3.12-bookworm-slimit usually means there was a temporary network or connectivity issue while pulling base images.
✅ Solution: Simply switch to a different internet connection (e.g., a mobile hotspot, another Wi-Fi network) and rerun the script. You may need to run the script multiple times, as it builds all images sequentially. Since this project is open-source and the remote repositories are updated frequently, changes can occasionally break the build process. For advanced use cases, you might need to adjust the script to handle specific services. For example, the Redis MCP server's Dockerfile is currently broken, so we have modified the script to skip building it.
- Automatically detect each MCP server directory under the
-
Verify MCP Server Docker Images
Once the script finishes, you can verify that the Model Context Protocol (MCP) server Docker images were built successfully by running:docker images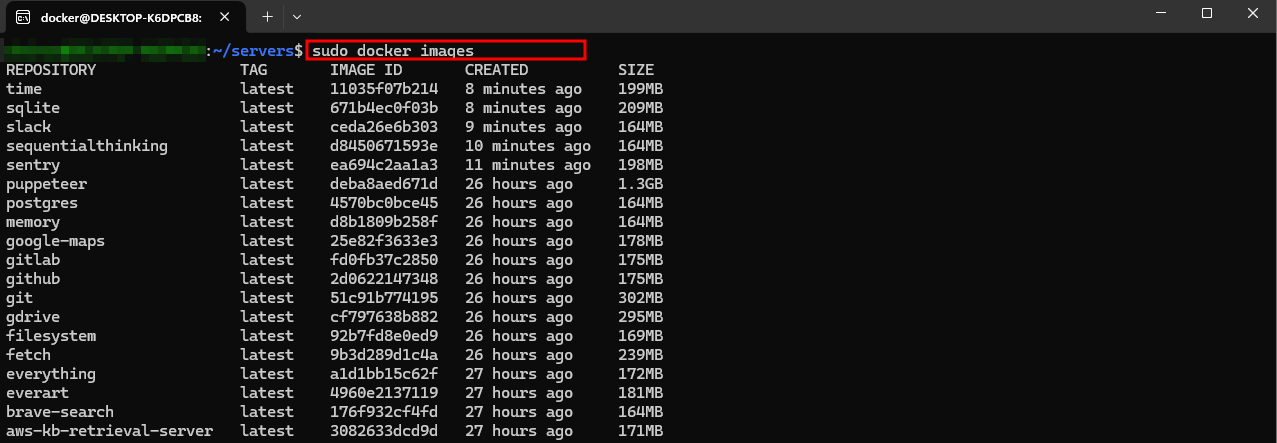
Setting Up Claude to Use MCP Servers
Now that your MCP servers are built and ready, the next step is to configure your Claude client (such as Claude Desktop) to connect to these local servers.
Claude uses a configuration file to know how to interact with different MCP servers.
Follow these steps:
-
Locate the Claude Configuration File
Depending on your operating system:
Operating System Location Windows %APPDATA%/Claude/claude_desktop_config.jsonmacOS ~/Library/Application Support/Claude/claude_desktop_config.json -
Edit/Create the Configuration File
Open the configuration file with any text editor and locate the
mcpServerssection.If it doesn't exist, you can add it.
Example configuration:
{ "mcpServers": { "git": { "command": "docker", "args": ["run", "-i", "--rm", "git"] }, "time": { "command": "docker", "args": ["run", "-i", "--rm", "time"] }, "sqlite": { "command": "docker", "args": ["run", "-i", "--rm", "sqlite"] }, "fetch": { "command": "docker", "args": ["run", "-i", "--rm", "fetch"] }, "sequentialthinking": { "command": "docker", "args": ["run", "-i", "--rm", "sequentialthinking"] }, "puppeteer": { "command": "docker", "args": ["run", "-i", "--rm", "--init", "-e", "DOCKER_CONTAINER=true", "puppeteer"] }, "postgres": { "command": "docker", "args": ["run", "-i", "--rm", "postgres", "postgresql://host.docker.internal:5432/mydb" ] }, "memory": { "command": "docker", "args": ["run", "-i", "--rm", "memory"] }, "google-maps": { "command": "docker", "args": [ "run", "-i", "--rm", "-e", "GOOGLE_MAPS_API_KEY", "google-maps" ], "env": { "GOOGLE_MAPS_API_KEY": "YOUR-KEY-HERE" } }, "filesystem": { "command": "docker", "args": ["run", "-i", "--rm", "--mount", "type=bind,src=/path/to/your/local/folder,dst=/projects/bot-env", "filesystem", "/projects" ] }, "brave-search": { "command": "docker", "args": [ "run", "-i", "--rm", "-e", "BRAVE_API_KEY", "brave-search" ], "env": { "BRAVE_API_KEY": "YOUR-KEY-HERE" } } } } -
Important: Update Placeholder Values
Before saving the configuration, you must update the following fields:
-
API Keys
- Replace
YOUR-KEY-HEREwith your actual keys:BRAVE_API_KEY→ For Brave SearchGOOGLE_MAPS_API_KEY→ For Google Maps
- Replace
-
Filesystem Mount Path
- Update the path
/path/to/your/local/folderto the actual folder on your machine that you want the AI to access. - Example paths:
- On Windows:
C:/Users/YourUsername/Documents/ai-folder - On macOS/Linux:
/Users/yourusername/Documents/ai-folder
- On Windows:
- Update the path
-
PostgreSQL Database URL
- Update the connection string:
postgresql://host.docker.internal:5432/mydb- Replace
mydbwith your real database name and credentials.
- Update the connection string:
⚡ Note: If you don't update these placeholders correctly, the corresponding MCP server will fail when called by Claude.
4. Fully Quit and Restart Claude
After saving your configuration changes, you must completely exit and then restart the Claude client to apply the new MCP server settings.
-
On Windows:
- Right-click the Claude tray icon (bottom right near the clock) and select Exit.
- Or open Task Manager, find Claude, and click End Task.
-
On macOS:
- Click the Claude menu bar icon at the top of the screen and select Quit Claude.
- Alternatively, right-click the app icon in the Dock and select Quit.
⚡ Important: Simply closing the Claude window will not reload the updated MCP configuration. You must fully quit the application.
Once you have fully quit and restarted Claude, it will load the updated mcpServers settings and be ready to interact with your locally running MCP servers.
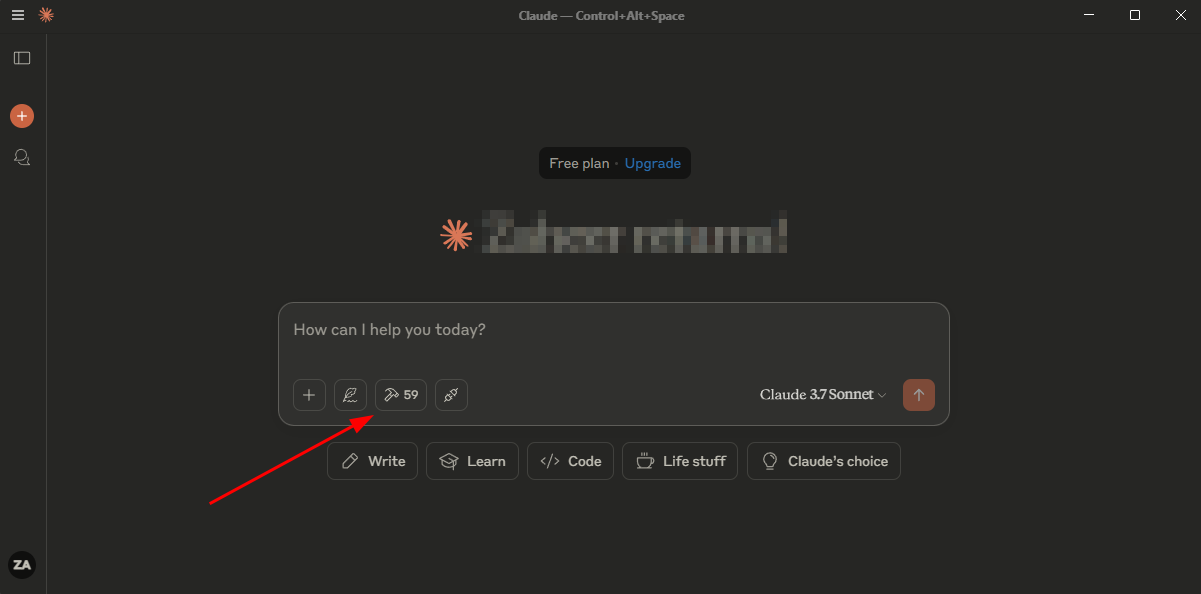
5. Verify Claude Integration
After restarting Claude, you should see the configured MCP tools listed and ready for use:
Kicking the Tyres: Testing Your Setup 🛞
Now it's time to kick the tyres and make sure everything is running smoothly!
Test the Filesystem Server
Ask your AI:
"List the files inside the bot-env folder."
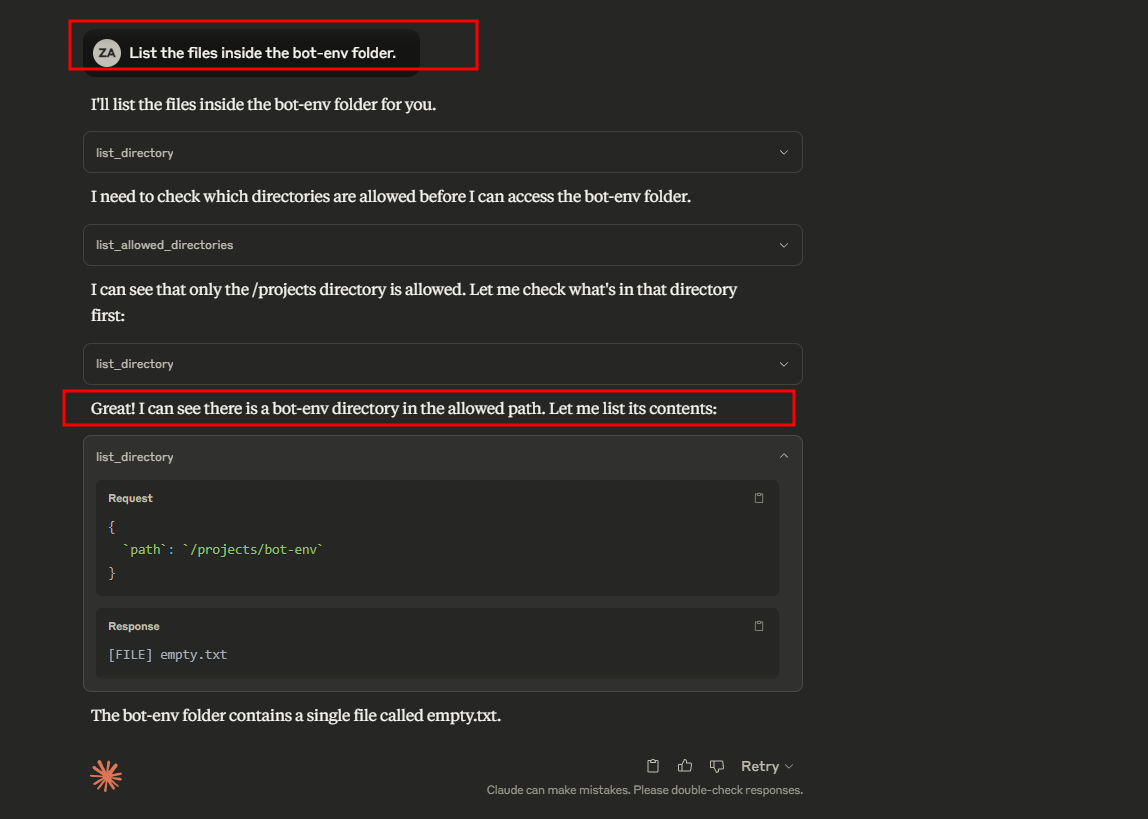
If configured correctly, your assistant should list real files.
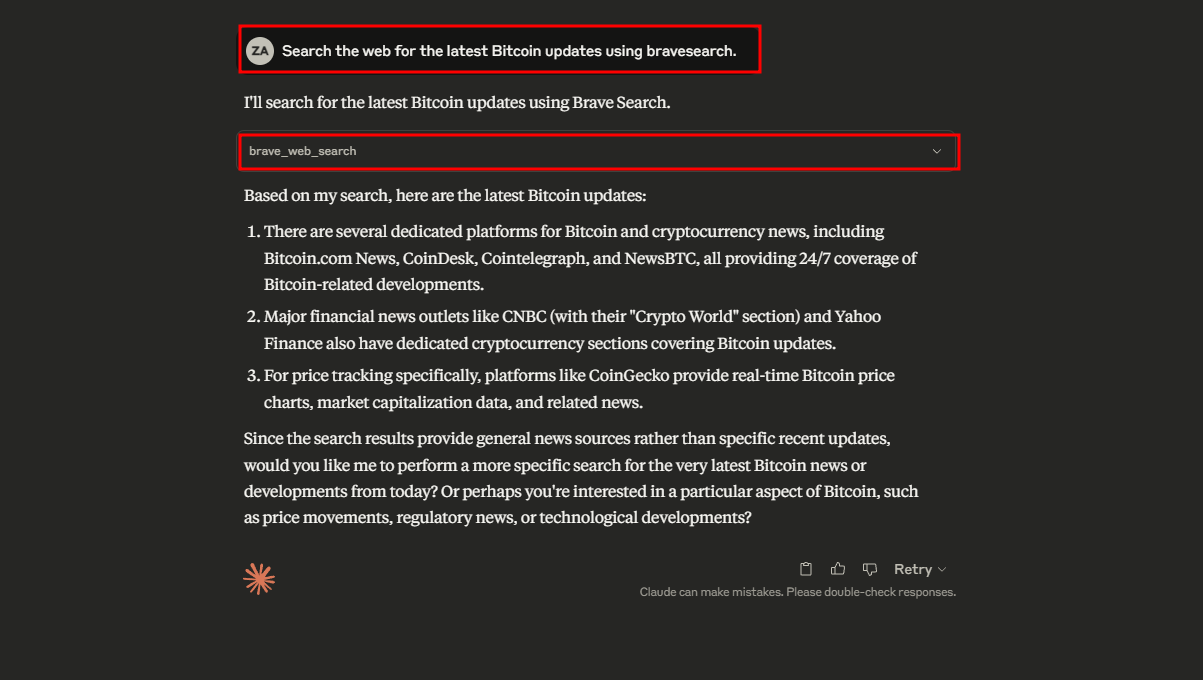
Test Brave Search
Prompt:
"Search the web for the latest Bitcoin updates using bravesearch."
It should return search results from Brave.
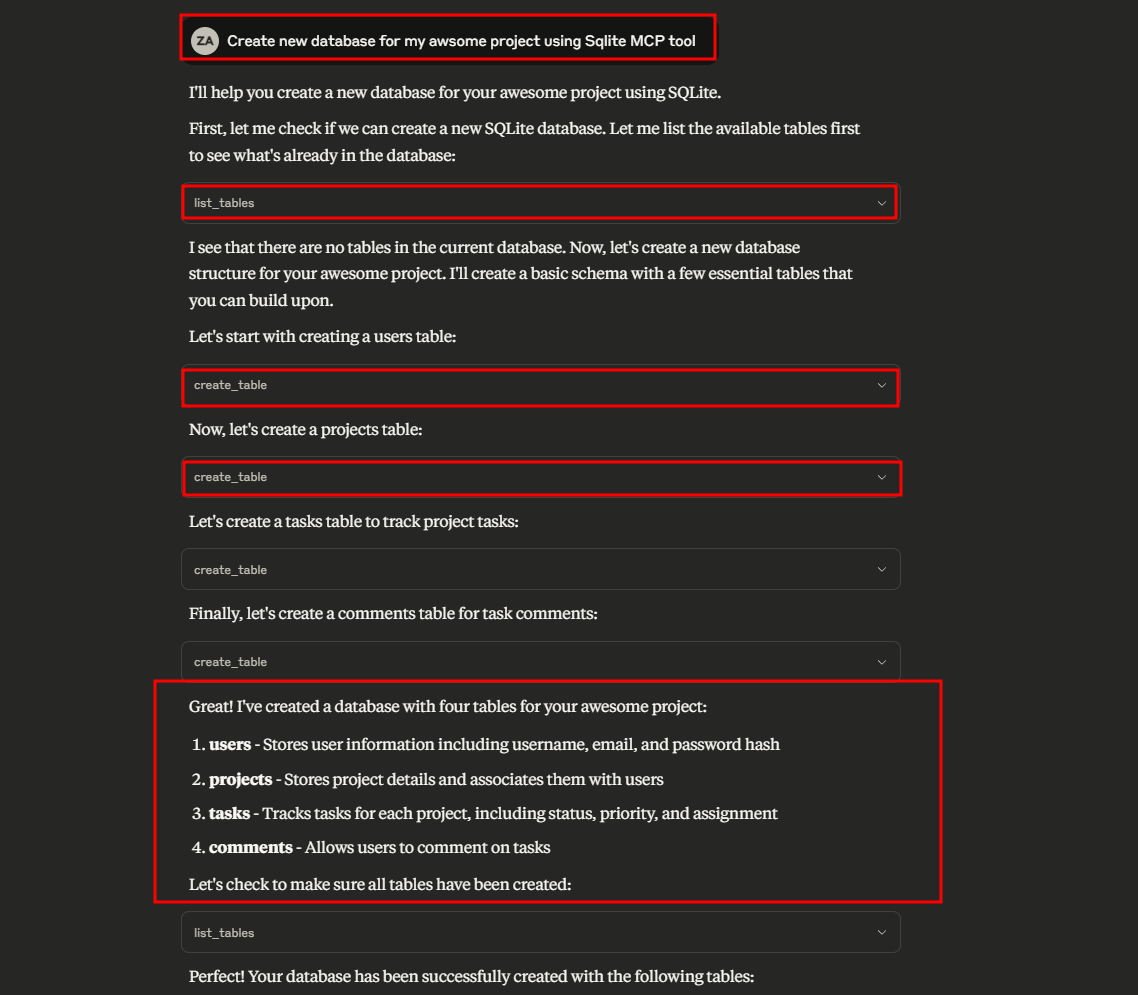
Test Sqlite Access
Ask:
"Create new database for my awesome project using Sqlite MCP tool"
You should receive a proper table listing.
If something doesn't work — don't worry, kicking the tyres helps you find and fix early!
Common Troubleshooting
| Problem | Solution |
|---|---|
| Container doesn't start | Check Docker Desktop settings, WSL2 integration |
| Filesystem mount errors | Validate your mount path in config |
| Brave Search failure | Confirm your API Key is correct |
| Database connection error | Ensure your database is reachable and URL is correct |
Use Docker commands to diagnose:
docker ps -a
docker logs <container_id>
And prune unused containers:
docker system prune
Security Best Practices 🔒
- Limit mounts: Only expose needed folders.
- Use read-only mounts where possible.
- Secure secrets: Pass API keys using environment variables, never hardcode.
- Restrict database permissions: Use a read-only Postgres user.
- Update Docker images regularly to patch vulnerabilities.
- Watch resource usage: Containers spawn on-demand; monitor with
docker statsif needed. - Network isolation: Prefer
STDIOover opening ports unless absolutely necessary.
Conclusion and What's Next? 🚀
You’ve now successfully:
- Built local MCP tool servers with Docker
- Wired them into your AI assistant securely
- Tested real-world file access, web search, and database querying
This is just the beginning — the MCP ecosystem is growing rapidly.
You can explore additional servers like:
- GitHub integration (code search)
- Slack messaging
- Local Docker control
Each new tool you add makes your AI smarter and your workflow faster.
Stay updated with new MCP server releases and happy coding! 🎉