Deploying Remote MCP Servers on AWS EC2
Introduction
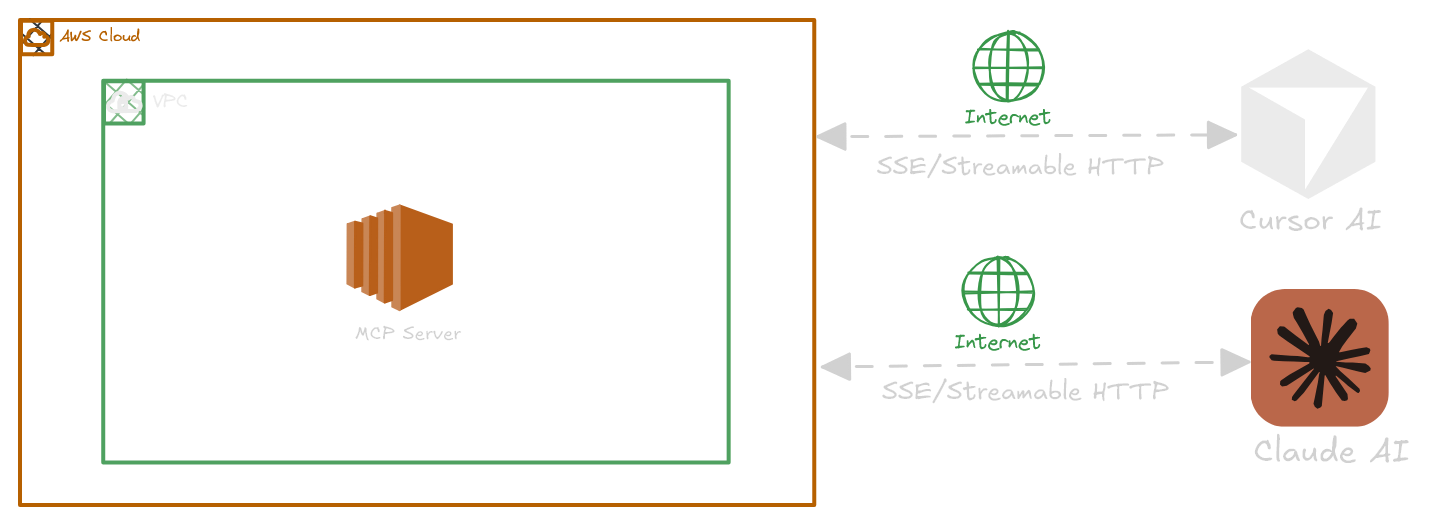
Setting up MCP servers on AWS provides you with complete control over your infrastructure. This approach can help address various security concerns commonly faced by startups and business owners. With AWS, you can manage your configurations, networks, and security features. This setup is ideal for running custom MCP servers for your team while ensuring they remain protected from unauthorized access.
In this guide, we will cover the basics of MCP servers and explain how each transport protocol—Stdio, Server-Sent Events (SSE), and Streamable HTTP—functions in practical terms. We will walk you through the process of getting each type of MCP server up and running on AWS EC2 step by step. Additionally, you will find code examples, security tips, and methods for automating tasks to simplify your experience.
What is Model Context Protocol and How Does It Work?
The Model Context Protocol (MCP) allows AI models, like LLMs, to easily connect with different tools, data, and services. You can think of it as a plug-in system where the AI (acting as the host) talks to different MCP servers to fetch files, run tools, or make API calls—all using basic JSON-RPC messages. You can learn more about MCP servers and protocols here.
MCP provides three connection methods based on your needs:
-
stdio: Ideal for local setups. Your AI runs the server as a subprocess and communicates through standard input/output. -
Server-Sent Events (SSE): Great for real-time updates. The server sends messages over a constantHTTPconnection while the client sends requests with regularPOSTs. This is a good choice for EC2-based HTTP servers that need live updates. -
Streamable HTTP: The most adaptable choice. It can manage both standard requests and server-to-client streams over plainHTTP. It’s straightforward, doesn't maintain state, and is perfect for scaling, especially on EC2.
Each method has its own strengths and weaknesses. The rest of this guide will help you choose and set up the right one for your needs on AWS EC2.
Deploying SSE-based MCP Servers on AWS EC2
In this example, we’ll walk through deploying a Python-based MCP server on an AWS EC2 instance using Server-Sent Events (SSE) as the transport protocol.
The server is designed to list all public S3 buckets within a specified AWS region. Below is the directory structure of the MCP server project:
s3-bucket-lister
├── mcp_s3_bucket_lister
│   ├── __main__.py
│   └── server.py
└── pyproject.toml
__main__.py
from .server import main

if __name__ == "__main__":
    main()
server.py
import contextlib
import logging
import os
from collections.abc import AsyncIterator

import anyio
import boto3
import click
import mcp.types as types
from mcp.server.lowlevel import Server
from mcp.server.sse import SseServerTransport
from starlette.applications import Starlette
from starlette.responses import Response
from starlette.routing import Mount, Route
from starlette.types import Receive, Scope, Send
from botocore.config import Config

# Configure logging
logger = logging.getLogger(__name__)

def get_aws_credentials():
    """Get AWS credentials from environment variables."""
    aws_access_key = os.getenv('AWS_ACCESS_KEY_ID')
    aws_secret_key = os.getenv('AWS_SECRET_ACCESS_KEY')
    aws_session_token = os.getenv('AWS_SESSION_TOKEN')

    if not aws_access_key or not aws_secret_key:
        raise ValueError(
            "AWS credentials not found. Please set AWS_ACCESS_KEY_ID and "
            "AWS_SECRET_ACCESS_KEY environment variables."
        )

    return {
        'aws_access_key_id': aws_access_key,
        'aws_secret_access_key': aws_secret_key,
        'aws_session_token': aws_session_token
    }

def is_bucket_public(bucket_name: str, s3_client) -> bool:
    """Check if an S3 bucket is public."""
    try:
        # Get bucket ACL with timeout
        acl = s3_client.get_bucket_acl(Bucket=bucket_name)

        # Check for public access grants
        for grant in acl.get('Grants', []):
            grantee = grant.get('Grantee', {})
            if grantee.get('URI') == 'http://acs.amazonaws.com/groups/global/AllUsers':
                return True
            if grantee.get('URI') == 'http://acs.amazonaws.com/groups/global/AuthenticatedUsers':
                return True
        return False
    except Exception as e:
        logger.error(f"Error checking bucket {bucket_name}: {str(e)}")
        return False

@click.command()
@click.option("--port", default=3005, help="Port to listen on for SSE")
@click.option(
    "--log-level",
    default="INFO",
    help="Logging level (DEBUG, INFO, WARNING, ERROR, CRITICAL)",
)
@click.option(
    "--aws-region",
    default="us-east-1",
    help="AWS region to use for S3 operations",
)
def main(
    port: int,
    log_level: str,
    aws_region: str,
) -> int:
    # Configure logging
    logging.basicConfig(
        level=getattr(logging, log_level.upper()),
        format="%(asctime)s - %(name)s - %(levelname)s - %(message)s",
    )

    # Check AWS credentials
    try:
        aws_credentials = get_aws_credentials()
        logger.info("AWS credentials found in environment variables")
    except ValueError as e:
        logger.error(str(e))
        return 1

    app = Server("mcp-s3-bucket-lister")

    @app.call_tool()
    async def call_tool(
        name: str, arguments: dict
    ) -> list[types.TextContent | types.ImageContent | types.EmbeddedResource]:
        ctx = app.request_context

        try:
            # Initialize S3 client with timeouts and retries
            config = Config(
                connect_timeout=60,  # 60 seconds connection timeout
                read_timeout=60,     # 60 seconds read timeout
                retries={'max_attempts': 3}  # Retry failed requests up to 3 times
            )

            s3_client = boto3.client(
                's3',
                region_name=aws_region,
                config=config,
                **aws_credentials
            )

            # List all buckets with timeout
            response = s3_client.list_buckets()
            buckets = response.get('Buckets', [])

            # Check each bucket for public access
            public_buckets = []
            for bucket in buckets:
                bucket_name = bucket['Name']
                if is_bucket_public(bucket_name, s3_client):
                    public_buckets.append(bucket_name)
                    # Send notification for each public bucket found
                    await ctx.session.send_log_message(
                        level="info",
                        data=f"Found public bucket: {bucket_name}",
                        logger="s3_bucket_lister",
                        related_request_id=ctx.request_id,
                    )

            # Send final summary
            summary = f"Found {len(public_buckets)} public buckets: {', '.join(public_buckets)}"
            await ctx.session.send_log_message(
                level="info",
                data=summary,
                logger="s3_bucket_lister",
                related_request_id=ctx.request_id,
            )

            # Return the result as a formatted text content
            return [
                types.TextContent(
                    type="text",
                    text=(
                        f"Public S3 Buckets Report:\n"
                        f"------------------------\n"
                        f"Total public buckets found: {len(public_buckets)}\n"
                        f"Public buckets:\n" +
                        "\n".join(f"- {bucket}" for bucket in public_buckets) +
                        f"\n\nFull summary: {summary}"
                    ),
                )
            ]

        except Exception as e:
            error_msg = f"Error listing S3 buckets: {str(e)}"
            logger.error(error_msg)
            await ctx.session.send_log_message(
                level="error",
                data=error_msg,
                logger="s3_bucket_lister",
                related_request_id=ctx.request_id,
            )
            return [
                types.TextContent(
                    type="text",
                    text=error_msg,
                )
            ]

    @app.list_tools()
    async def list_tools() -> list[types.Tool]:
        return [
            types.Tool(
                name="list-public-s3-buckets",
                description="Lists all public S3 buckets in the configured AWS region",
                inputSchema={
                    "type": "object",
                    "properties": {},
                },
            )
        ]

    # Create the SSE transport
    sse = SseServerTransport("/messages/")

    async def handle_sse(request):
        async with sse.connect_sse(
            request.scope, request.receive, request._send
        ) as streams:
            await app.run(
                streams[0], streams[1], app.create_initialization_options()
            )
        return Response()

    # Create an ASGI application using the SSE transport
    starlette_app = Starlette(
        debug=True,
        routes=[
            Route("/sse", endpoint=handle_sse, methods=["GET"]),
            Mount("/messages/", app=sse.handle_post_message),
        ],
    )

    import uvicorn
    uvicorn.run(starlette_app, host="0.0.0.0", port=port)

    return 0
pyproject.toml
[project]
name = "mcp-s3-bucket-lister"
version = "0.1.0"
description = "MCP server that lists public S3 buckets using SSE protocol"
authors = [
    { name = "Zaheer Ahmad", email = "your.email@example.com" }
]
readme = "README.md"
requires-python = ">=3.8"
license = { text = "MIT" }
classifiers = [
    "Development Status :: 4 - Beta",
    "Intended Audience :: Developers",
    "License :: OSI Approved :: MIT License",
    "Programming Language :: Python :: 3",
    "Programming Language :: Python :: 3.8",
    "Programming Language :: Python :: 3.9",
    "Programming Language :: Python :: 3.10",
    "Programming Language :: Python :: 3.11",
]

dependencies = [
    "mcp>=0.1.0",
    "boto3>=1.26.0",
    "starlette>=0.27.0",
    "uvicorn>=0.23.0",
    "click>=8.1.0",
    "anyio>=3.7.0",
]

[project.optional-dependencies]
dev = [
    "pytest>=7.0.0",
    "black>=23.0.0",
    "isort>=5.12.0",
    "mypy>=1.0.0",
]

[project.scripts]
s3-bucket-lister = "mcp_s3_bucket_lister.server:main"

[build-system]
requires = ["hatchling"]
build-backend = "hatchling.build"

[tool.hatch.build.targets.wheel]
packages = ["mcp_s3_bucket_lister"]

[tool.black]
line-length = 88
target-version = ["py38"]

[tool.isort]
profile = "black"
multi_line_output = 3

[tool.mypy]
python_version = "3.8"
warn_return_any = true
warn_unused_configs = true
disallow_untyped_defs = true
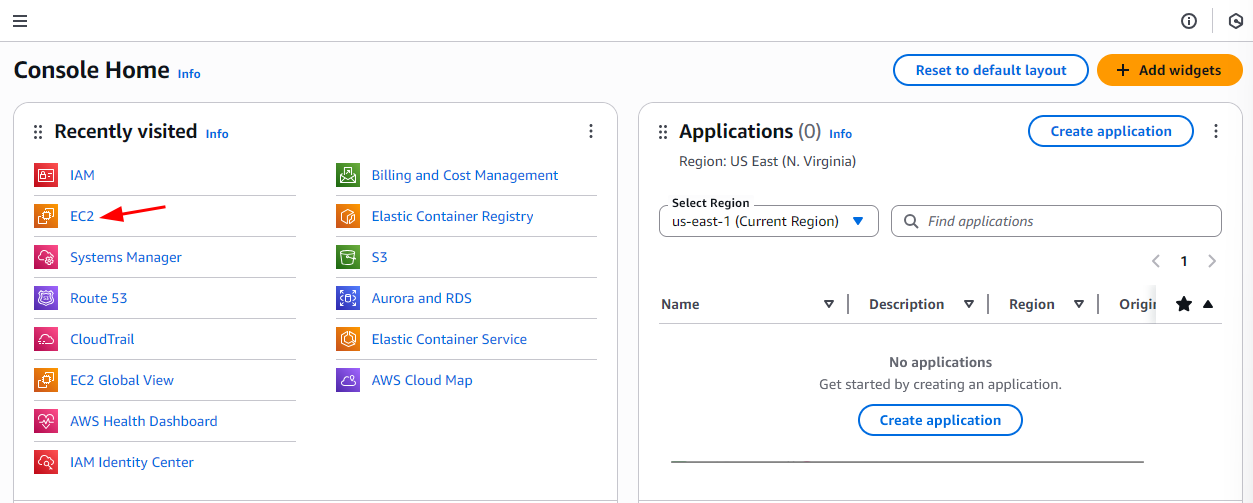
1. Setup EC2 Instance
- Login into your AWS account and select EC2 from the console:
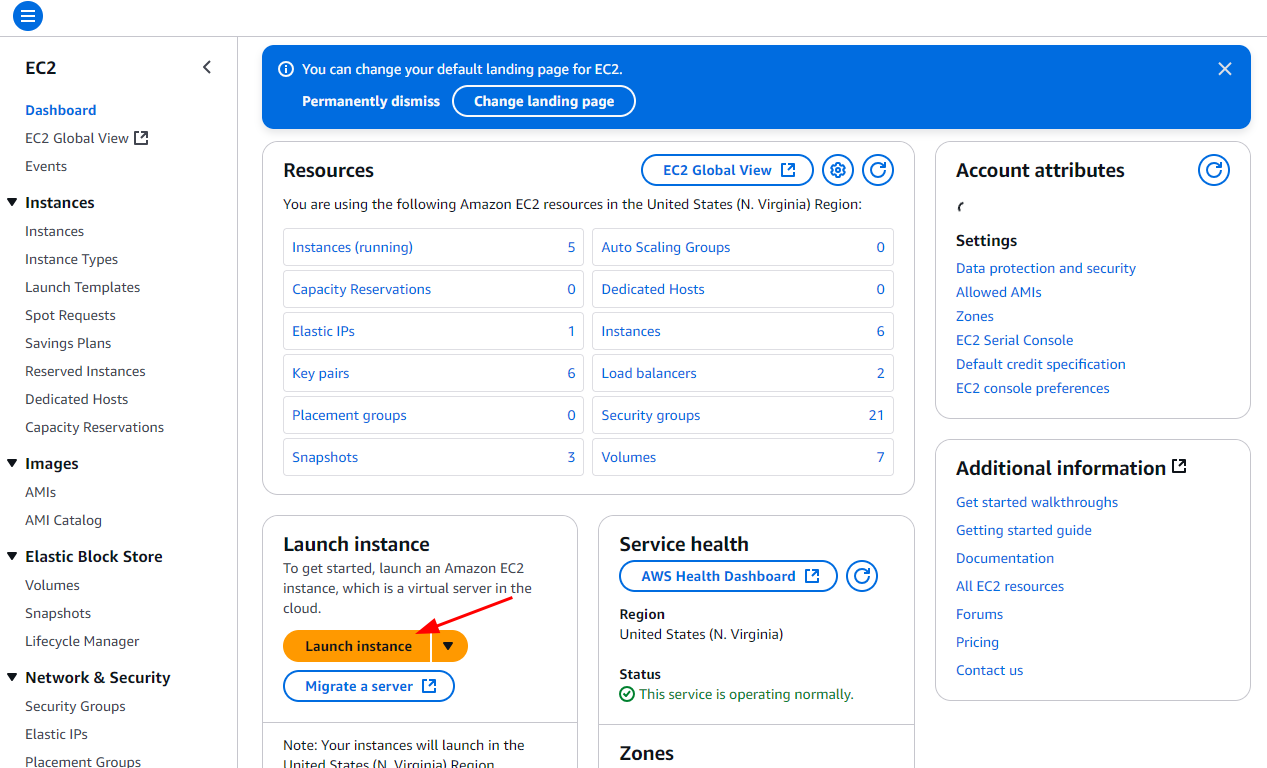
- From EC2 Dashboard, Launch new instance:
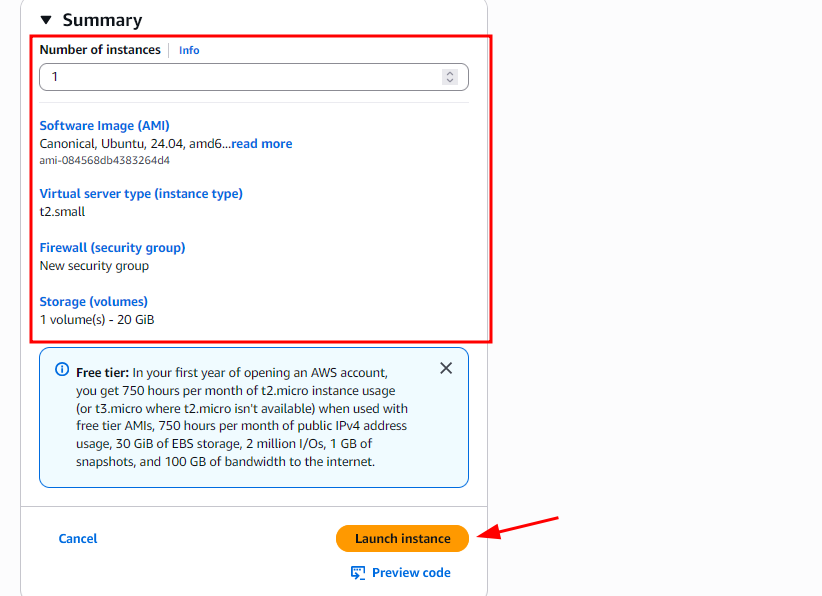
2. EC2 Configurations
Follow these steps to configure your EC2 instance for MCP server:
-
Name:
Give your instance a recognizable name, such asmcp-server.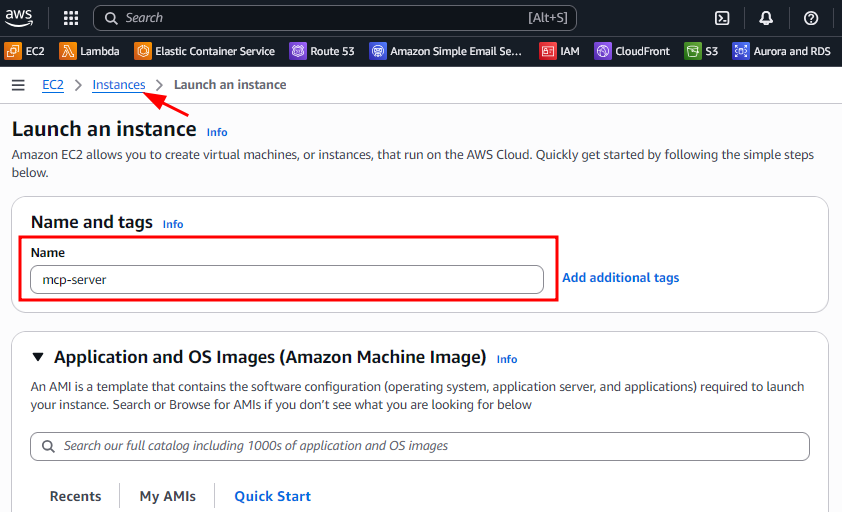
-
AMI:
Select Ubuntu as the Amazon Machine Image (AMI).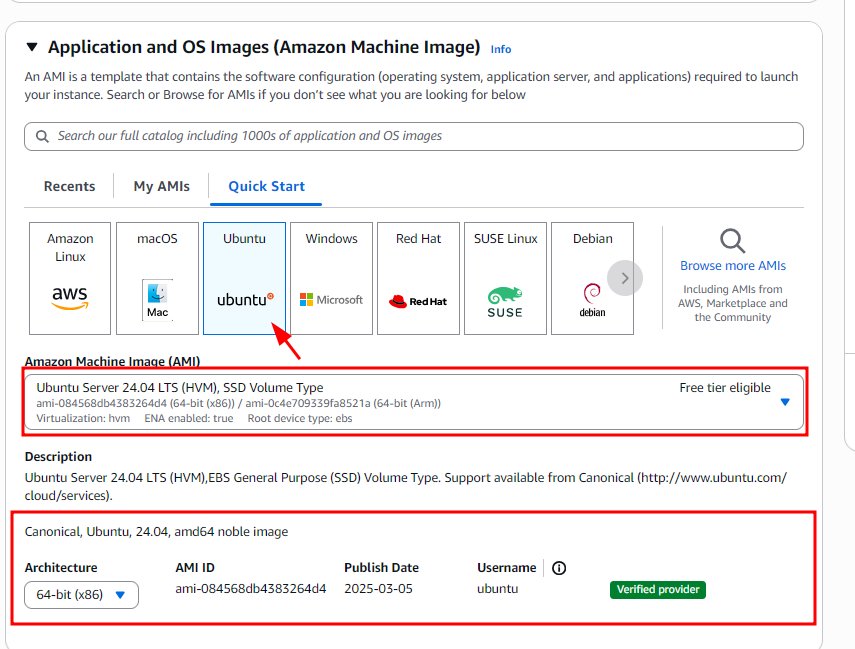
-
Instance Type:
Chooset2.small(sufficient for basic MCP server usage).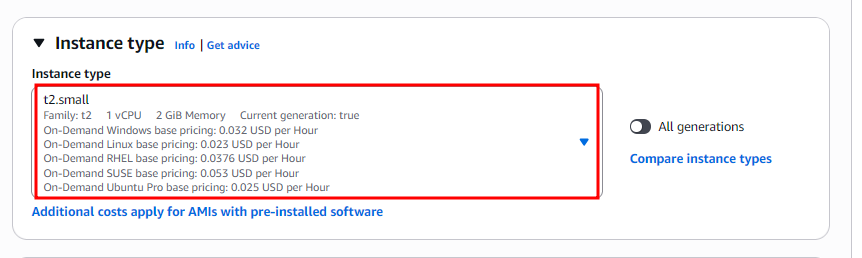
-
Key Pair:
Generate a new key pair from the EC2 dashboard and download the.pemfile for SSH access.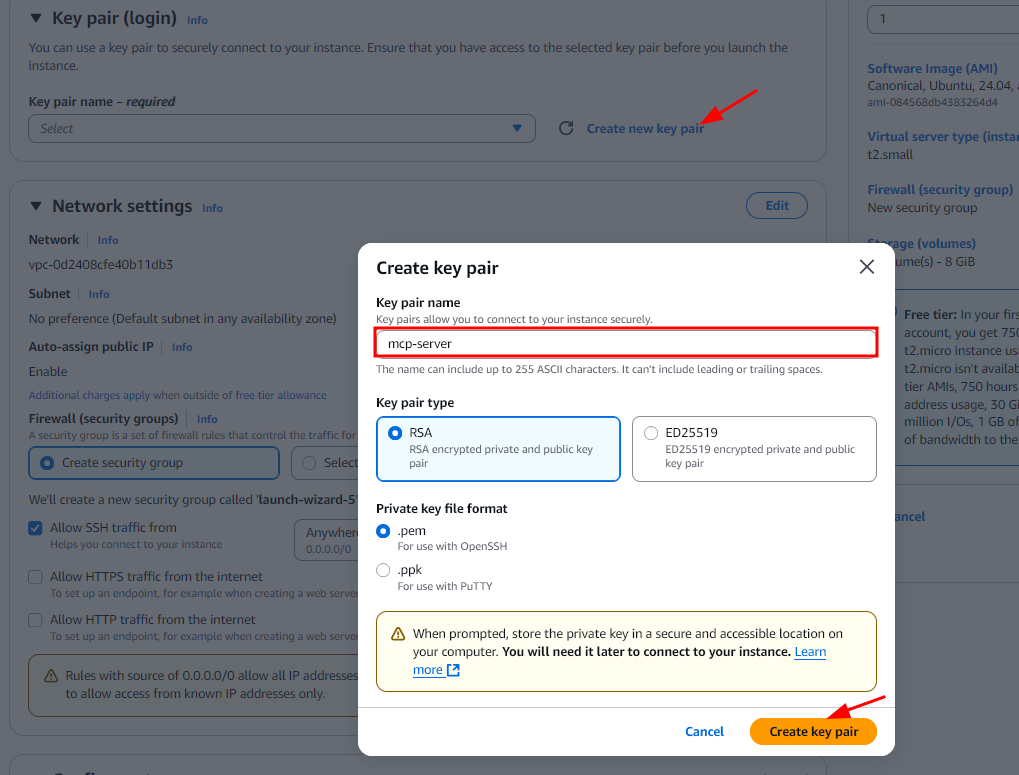
-
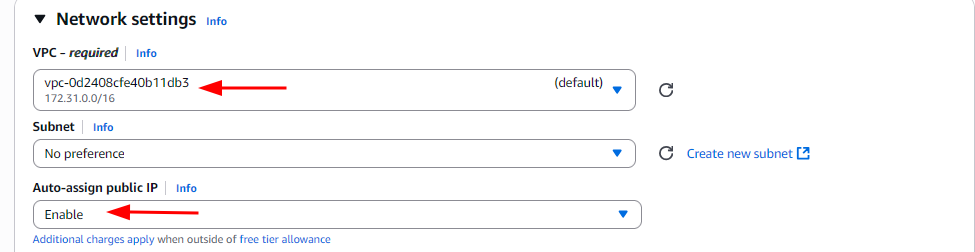
Network Settings:
-
Select the default VPC.
-
Enable Auto-assign Public IP to access the instance remotely.
-
-
Security Group Settings:
-
Allow SSH (port 22) from all sources (
0.0.0.0/0) for initial setup.
⚠️ For production environments, restrict this to your IP address only. -
Add a new Custom TCP Rule for port 3005 (or the port your MCP server uses) with source
0.0.0.0/0.
⚠️ Restrict access to known IPs in production for security.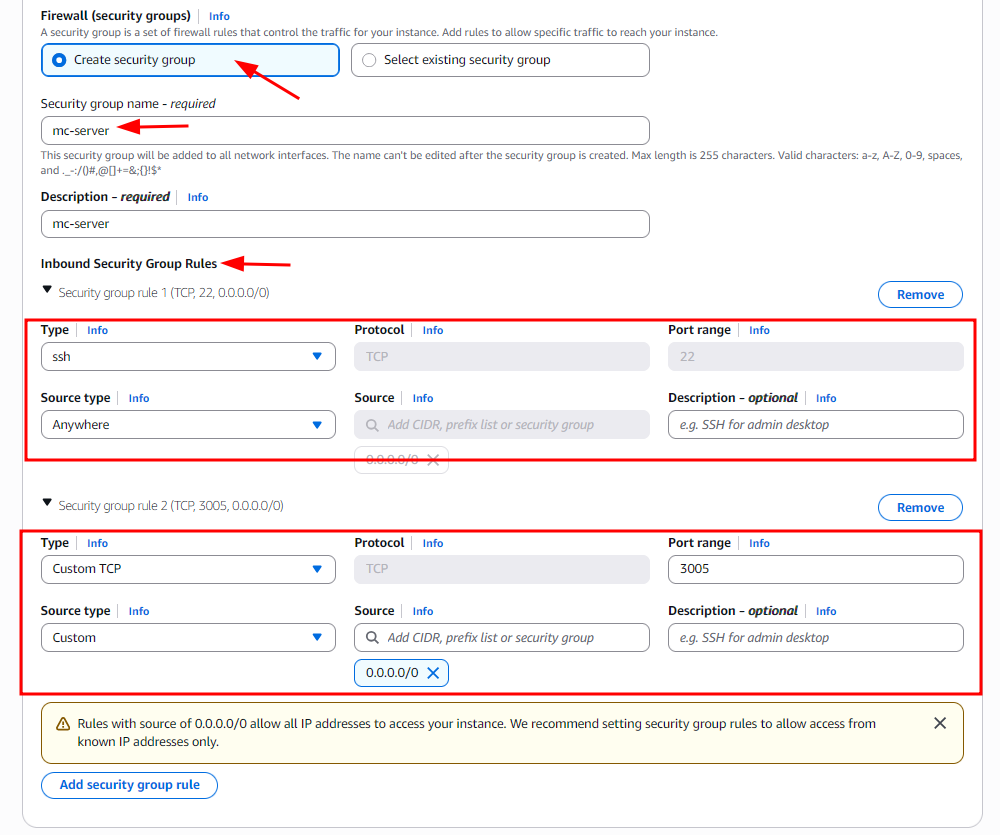
-
-
Storage:
-
Allocate 20 GB of disk space, which is sufficient for most MCP server deployments.

-
-
Launch the Instance:
-
After reviewing the configuration, click Launch in the EC2 Dashboard to start your instance.
-
3. Build and Deploy SSE MCP Server
💻 For Windows, use PowerShell
🐧 For macOS and Linux, use the Terminal
Connect to your EC2 instance via SSH and install the necessary packages to build the Python-based MCP server.
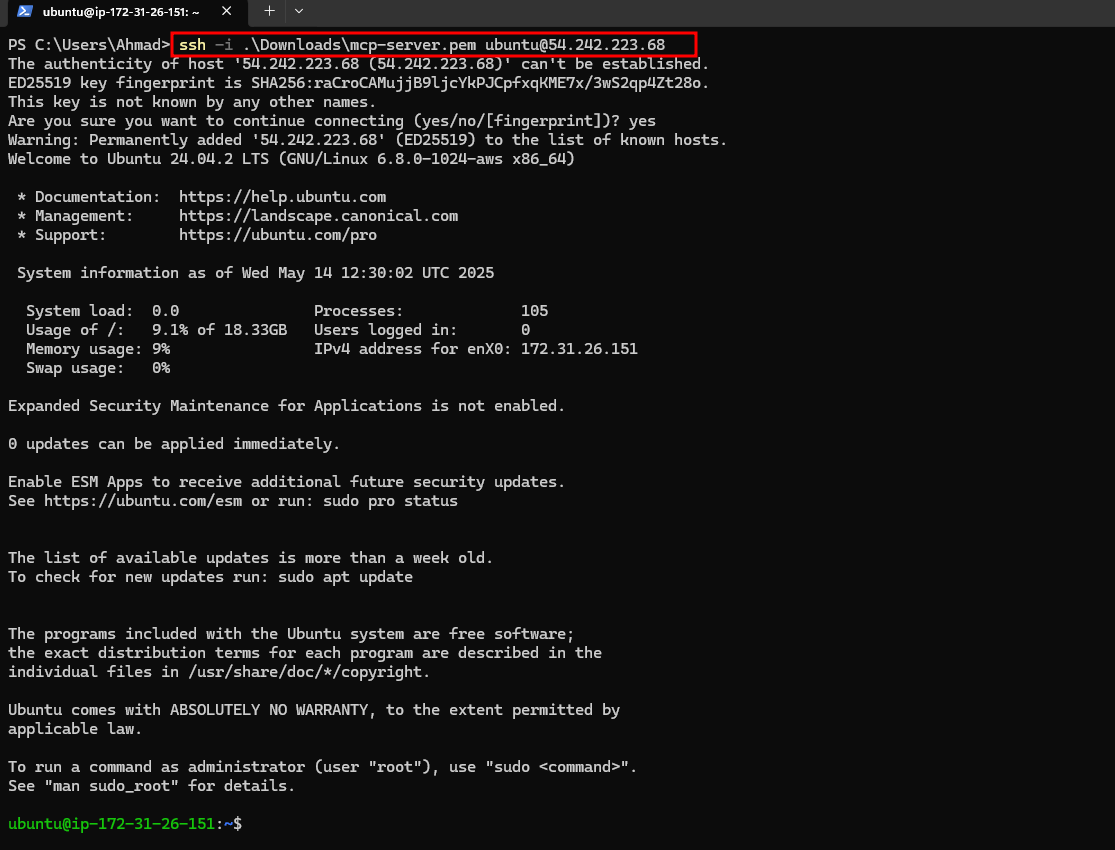
Step 1: Connect to EC2 via SSH
Use the private key generated in the previous step to connect to the instance:

ssh -i /path/to/your-key.pem ubuntu@<EC2-Public-IP>
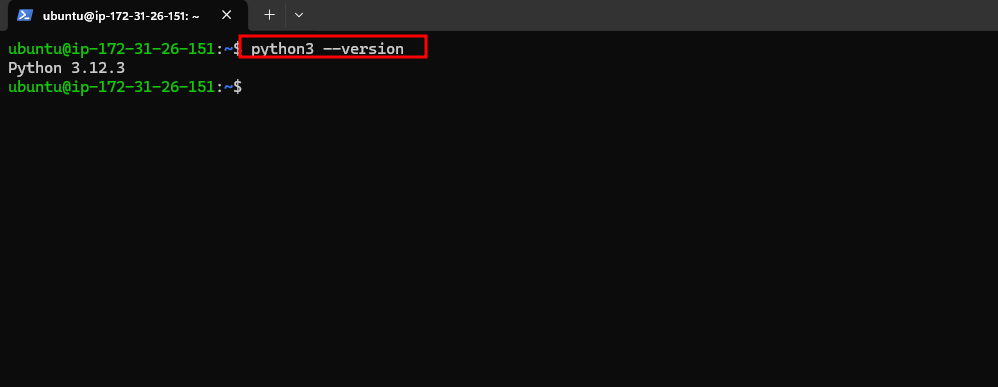
sudo apt update -y
python3 --version
Step 2: Copy Source Code from Local to EC2 Instance
Instead of creating the code files manually on the EC2 instance, we'll copy them using scp.
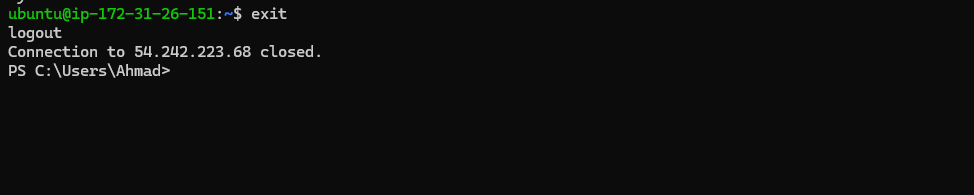
First, I need to exit the current SSH session:
exit
To transfer your project directory to the EC2 instance, use the following scp command template:
scp -r -i <path-to-private-key> <path-to-source-folder> ubuntu@<EC2-Public-IP>:~/
🔧 Command Breakdown
scp: Secure copy command-r: Recursively copies the entire directory-i: Specifies the identity file (private key)ubuntu@<EC2-Public-IP>: Remote EC2 username and IP:~/: Target directory on the EC2 instance (default home path)
🪟 Example for Windows (PowerShell):
scp -r -i .\Downloads\mcp-server.pem .\Desktop\s3-bucket-lister\ ubuntu@54.242.223.68:~/

<path-to-private-key>→.\Downloads\mcp-server.pem<path-to-source-folder>→.\Desktop\s3-bucket-lister\<EC2-Public-IP>→54.242.223.68
🐧 Example for macOS/Linux (Terminal):
scp -r -i ~/Downloads/mcp-server.pem ~/Desktop/s3-bucket-lister/ ubuntu@54.242.223.68:~/
<path-to-private-key>→~/Downloads/mcp-server.pem<path-to-source-folder>→~/Desktop/s3-bucket-lister/<EC2-Public-IP>→54.242.223.68
✅ Once all the files transfer, SSH to the EC2 instance again and list directories:
ls -lh

Step 3: Build Source Code
Here’s how to get your MCP server environment running:
-
First, go to the project directory:
cd s3-bucket-lister -
If you haven’t done it yet, install the virtual environment package:
sudo apt install python3.12-venv -y -
Next, create a Python virtual environment:
python3 -m venv venv -
Now, activate the virtual environment:
source venv/bin/activate -
Finally, install the project in editable mode:
pip install -e .
Step 4: Running the Example MCP Server
Since our MCP server interacts with AWS S3 buckets, it requires specific AWS credentials to function properly.
- Create a new IAM user via the AWS IAM Console.
- Generate an Access Key ID and Secret Access Key for this user.
- Attach the AmazonS3ReadOnlyAccess policy to ensure the user has read-only permissions to S3 resources.
✅ Note: Avoid using root credentials. Always use IAM users with the minimum required permissions for security best practices.
export AWS_ACCESS_KEY_ID='YOUR_AWS_ACCESS_KEY_ID'
export AWS_SECRET_ACCESS_KEY='YOUR_AWS_SECRET_ACCESS_KEY'
python -m mcp_s3_bucket_lister --port 3005 --aws-region us-east-1

Now, the server is up and running on port 3005 with SSE path http://YOUR_EC2_PUBLIC_IP:3005/sse
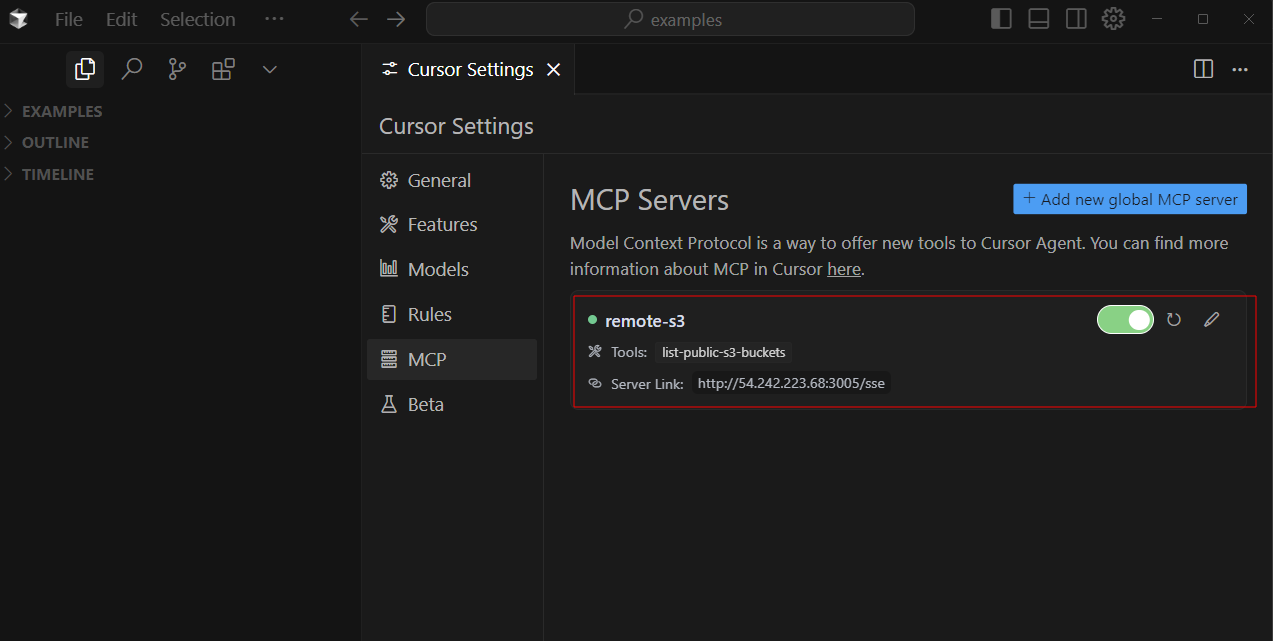
Step 5: Connecting the Remote MCP Server with Cursor AI
To connect your remote MCP server hosted on EC2 with Cursor AI:
- Launch Cursor AI.
- Open Settings.
- Add the MCP server configuration as shown below.

- MCP JSON Config:
{
  "mcpServers": {
    "remote-s3": {
      "transport": "sse",
      "url": "http://YOUR_EC2_PUBLIC_IP:3005/sse"
    }
  }
}
🔧 Replace
YOUR_EC2_PUBLIC_IPwith the actual public IP address of your EC2 instance.
Step 6: Testing the Connection
In Cursor AI, open the chat interface and enter the following prompt:
use your mcp s3 tool to list all public buckets
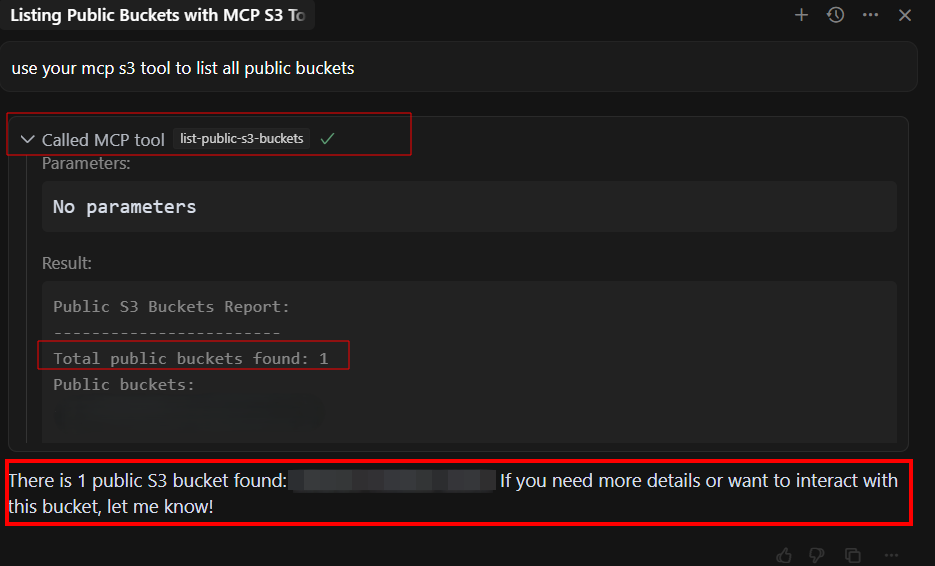
If everything is set up correctly, you’ll see the list of public S3 buckets returned by the MCP server.
As shown above, Cursor AI successfully connected to the remote MCP server running on your EC2 instance.
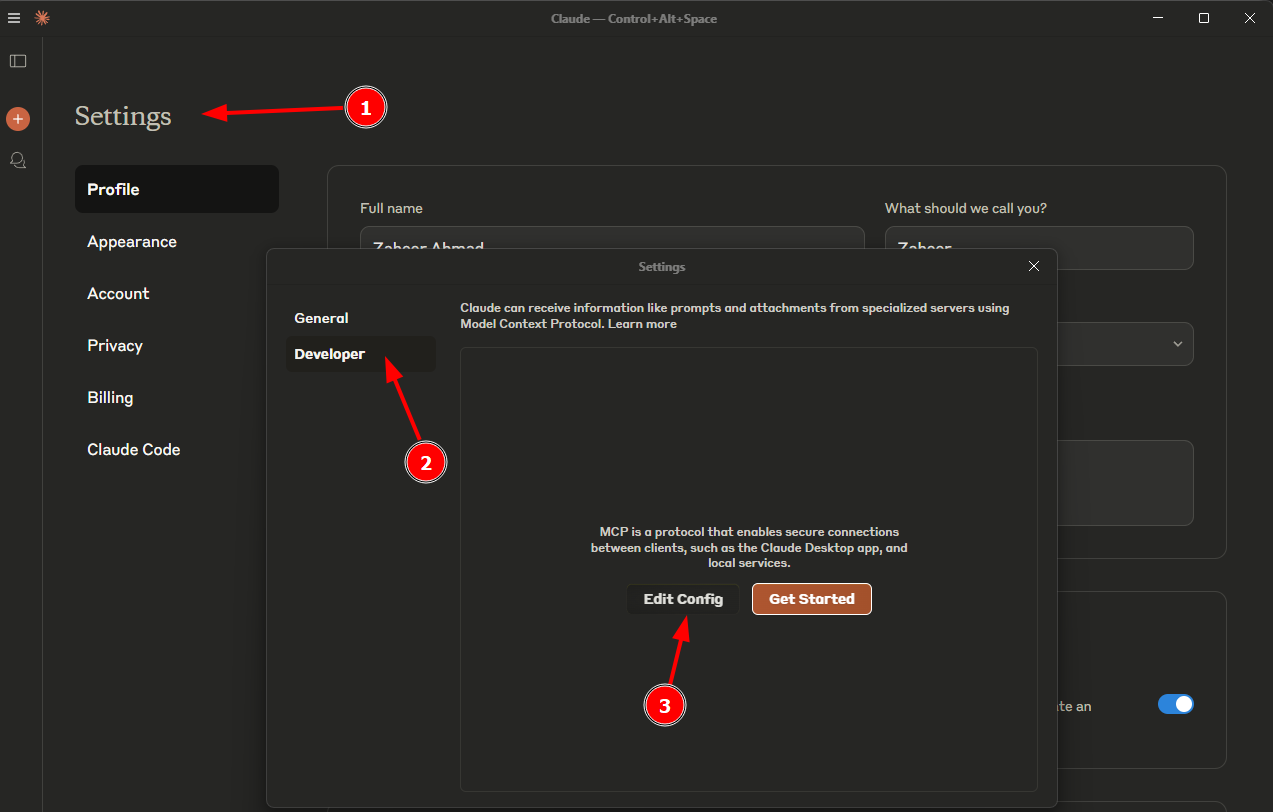
Step 7: Connecting the Remote MCP Server with Claude AI
To connect your remote MCP server hosted on EC2 with Claude AI:
- Launch Claude Desktop.
- Edit claude_desktop_config.json file.
- Add the MCP server configuration as shown below.
- MCP JSON Config:
{
  "mcpServers": {
    "mcp-s3-remote": {
      "command": "npx",
      "args": [
        "mcp-remote",
        "http://YOUR_EC2_PUBLIC_IP:3005/sse",
        "--allow-http"
      ]
    }
  }
}
🔧 Replace
YOUR_EC2_PUBLIC_IPwith the actual public IP address of your EC2 instance.
- Launch Claude AI — it will automatically detect and display our MCP server tool in the interface.
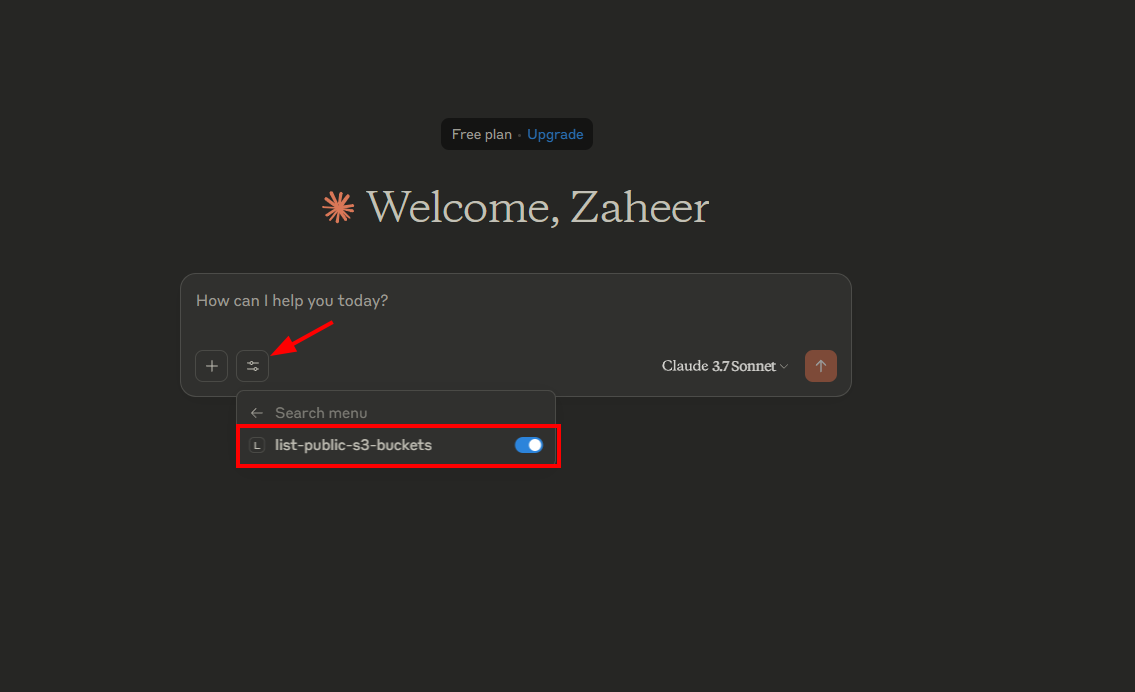
Step 8: Testing the Connection
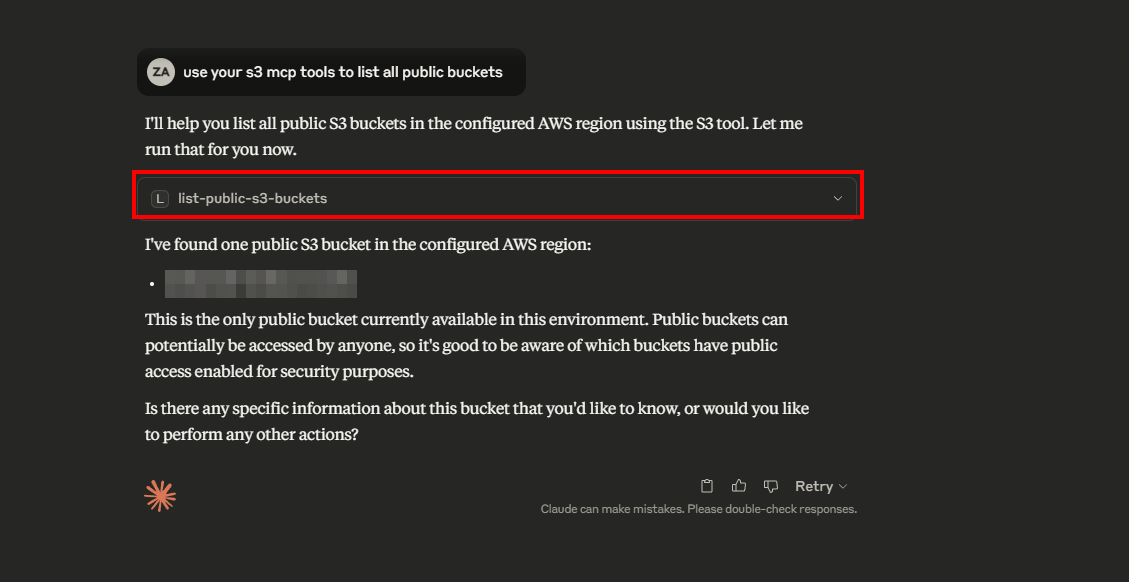
In Claude Desktop, open the chat interface and enter the following prompt:
use your s3 mcp tools to list all public buckets
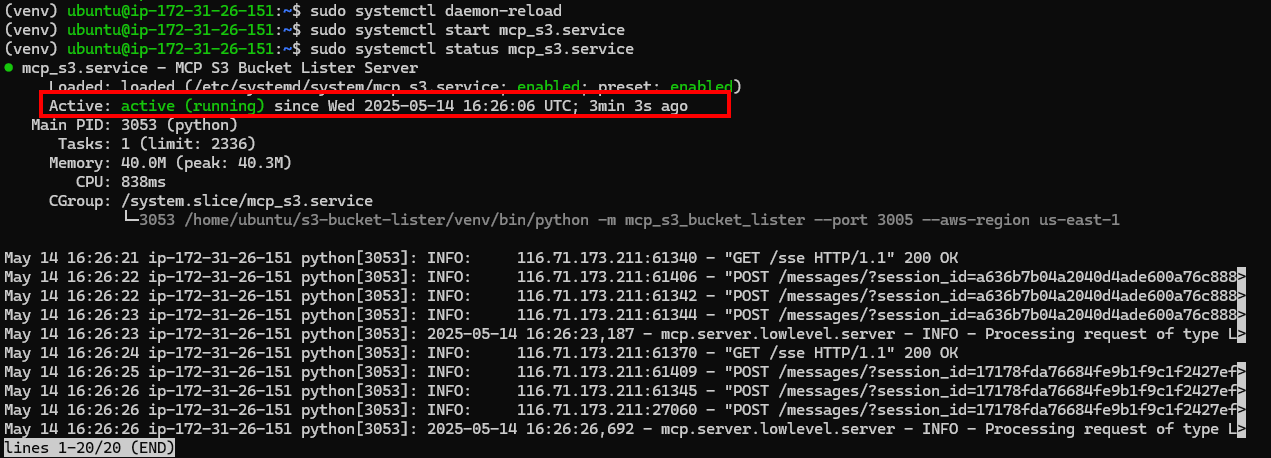
Step 9: Running the MCP Server as a Persistent Systemd Service
By default, if you start the MCP server directly in an SSH session, it will stop as soon as the session ends. To make it persistent on your EC2 instance, follow these steps:
Create a new service file at /etc/systemd/system/mcp_s3.service:
[Unit]
Description=MCP S3 Bucket Lister Server
After=network.target

[Service]
ExecStart=/home/ubuntu/s3-bucket-lister/venv/bin/python -m mcp_s3_bucket_lister --port 3005 --aws-region us-east-1
WorkingDirectory=/home/ubuntu/s3-bucket-lister
Environment="AWS_ACCESS_KEY_ID=YOUR_AWS_ACCESS_KEY_ID"
Environment="AWS_SECRET_ACCESS_KEY=YOUR_AWS_SECRET_ACCESS_KEY"
Restart=always
User=ubuntu
Group=ubuntu

[Install]
WantedBy=multi-user.target
sudo systemctl daemon-reload
sudo systemctl start mcp_s3.service
sudo systemctl enable mcp_s3.service
sudo systemctl status mcp_s3.service
Real-World Use Cases: Why Run MCP Servers on EC2?
Running MCP servers on AWS EC2 lets you securely extend LLMs with real-time tools, data, and automation. Here's how it enables powerful AI integrations:
| Use Case | Description | Example Tools |
|---|---|---|
| 🔐 Enterprise Data & Internal Tools | Secure access to internal databases, APIs, and business tools within a VPC. | query_sales_db, fetch_specs |
| 📚 AI Research Assistants | Fetch data from external APIs like PubMed, financial markets, or patents. | fetch_pubmed_articles, get_stock_quote |
| 💻 Code Execution & Automation | Safely let LLMs run code, tests, or interact with version control. | execute_python_script, run_unit_tests, git_commit |
| 🎓 Personalized Learning | Interact with student data and educational content securely. | get_lesson(topic), check_quiz_score(student_id) |
| 🔄 Business Workflow Automation | Automate tasks across CRMs, PM tools, and email services. | create_salesforce_lead, assign_jira_task, send_email |
| 🧾 Smarter Support Bots | Real-time access to user orders, products, and FAQs. | get_order_status(order_id), fetch_product_details(sku), search_faq(query) |
| 🤖 IoT Device Integration | Control or monitor physical devices via LLMs. | turn_on_light(device_id), get_sensor_data |
🛠️ With EC2, you control the stack: use IAM, secure your network, scale up/down, and install whatever you need — turning LLMs into real-world agents.
Conclusion:
The Model Context Protocol (MCP) is changing the way large language models (LLMs) interact with real-world tools and data. It uses standard transport protocols like stdio, SSE, and Streamable HTTP, making it easier to enhance AI features safely and flexibly.
Setting up MCP servers on AWS EC2 gives you control over security and flexibility to scale as needed while fitting well within the AWS ecosystem. This guide shows you how to set up EC2, create and run an MCP server, and get it ready for production using systemd.
Whether you're working with internal business tools, live data APIs, or IoT devices, MCP on EC2 offers a lot of options. Just make sure to follow best practices, secure your setup, and plan for maintenance.
MCP is still developing, and getting a handle on it now can really set you apart. Keep exploring, stay curious, and build AI that gets the world around it.